“Elegance is not a dispensable luxury but a quality that decides between success and failure.”—Edsger W. Dijkstra
Some of my favorite conversations have included the phrase “Can you just…?” As in: “You know that wireframe you created? Can you just make it into a fully interactive, branded clickthrough? The sales guys want to give a demo of our new product tomorrow.” Part of your brain is screaming, “No! No! That wireframe was to get a discussion going! We’re not nearly ready yet!” But you may find yourself saying, “Sure! When do you need it by? 4pm? No problem!” then setting up the coffee machine.
While you can always treat a request like this as an opportunity to get more user feedback—and perhaps to educate colleagues on the UX development process—sometimes you just need to bite the bullet, get on with it, and fulfill such requests. In such cases, having created your prototype in the right way to begin with can have major benefits. In this article, we’ll explore how you can apply one of the key principles of effective software development, component-based reuse, to the development of UX prototypes, thus making prototyping more effective. For the purpose of this article, I’ll encompass both low- and high-fidelity renderings of applications in the term prototype. We’ll look at how you can use Axure effectively and the benefits reuse can provide when using this tool.
Champion Advertisement
Continue Reading…
Making Reuse Work
Before we look at a detailed example, I want to make a couple of points about developing with Axure. It’s worthwhile to set up a master Axure file for each of your clients—or for a UX professional who is part of an organization, a master file for your organization. This master can include
basic page layouts—with centered content and any backgrounds
styles a client uses—set up using the style master
graphics and other assets the client uses
Once you’ve set up this master Axure file, it becomes the baseline for all prototyping work within an organization. Accuracy in wireframing is often a secondary consideration that gets sacrificed for greater development speed. In most cases, this is a false economy. Using accurate fonts and dimensions means page copy appears as it would in the real Web site or application, giving you a better understanding of how your copy fits. Having a single master prototype means you can use the widget style editor to ensure all your text panels use the correct font styles, as well as to create custom styles for various levels of headings. Using accurate width and height values for page elements means surprises are less likely when you progress to implementation.
Effective Use of Masters
In Axure, the effective use of masters is the key to reuse. Widgets have their place, but masters offer much more flexibility and control for the power user. Axure masters come in three types:
normal master—Once you’ve created and employed this master, if you change the master, those changes appear everywhere you’ve used that master.
background master—When you add this master, it snaps into the background of a page, using the same precise positioning you used when you originally created it.
custom widgets—You can edit these widgets like any other widgets once you’ve placed them into a wireframe.
To create a Web page header, you could create a single normal header master, including the logo and navigation, as shown in the example that appears in Figures 1 and 2.
Figure 1—A simple header
You can save time by creating the header as a background master, so it automatically snaps into the upper-left corner of the page. Tweaking your page setup so all content is centered on pages is another thing it’s good to set up in advance in your standard template!
While this approach is quick and easy, a better approach would be to take advantage of the ability to place masters within masters, thus creating four masters:
a background master that you’ve positioned in the upper-left corner of the page that contains
the header
a normal master that contains
logo
navigation
tagline
Figure 2—A component-based header
Breaking the header into its constituent elements gives us much more control over effective header management. We could, for instance, have multiple header masters in our Axure file—for instance, for an intranet, public Web site, and extranet—each of which shares the corporate logo. If the shared logo changes, replacing the logo in the normal master immediately applies the change to all headers that use it.
There’s one more thing that can increase the power of your masters: dynamic panels. Consider our first example of a client who wants a bare-bones wireframe, for which the focus was initially on developing effective content, but shifted to developing a fully interactive prototype. Putting your header master into a dynamic panel lets you select which dynamic panel you want to display in your generated prototype. Dynamic panels let you explore the use of different header options—from a placeholder image to one of several possible branded options. These different design options can reuse the same primary navigation, so you can generate navigable prototypes.
You can apply the same approach to other aspects of a design:
You can create footers using this approach, sharing common elements and switching between different levels of detail.
Create icons—including placeholders—of the same type as dynamic panels, moving them around as necessary.
Swap out copy of roughly the same size.
Returning to background masters, remember that these snap into the background at the position where you originally created them. So on Web pages, a secondary navigation bar at the left would typically appear in the same place, as would other elements on a site—for example, on the UXmatters site, the elements on the sidebar at the right of each page. Once you’ve created these as background masters in their correct location, you can drag them onto a wireframe, and they’ll snap into the correct place, letting you create a new page quickly, or combine them as masters for different page types.
Producing Multiple Prototypes from the Same Master
Once you’ve created your prototype to support different views, you can control the display of these views to your client. The simplest option is to control them manually—that is, change the states of your dynamic panels manually, then generate your prototype or export pages as needed. A more sophisticated approach—which is also more technically demanding—is to set up a prototype so either your client can control which version they see, or you can generate multiple prototypes by changing a single variable.
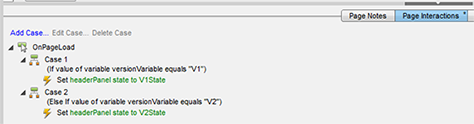
For example, assume that you have two versions of your design within the same Axure file, and you want to generate two different prototypes. These two designs might represent different visual styling options or different navigation options, for example. You can control these prototypes using dynamic panels, as I described earlier. Start by creating a variable called versionVariable, setting it to either V1 or V2, and representing the two different states. On the page that is the first to load, create a page interaction that sets the value of versionVariable to the correct version, as shown in Figure 3.
Figure 3—Page code to set versionVariable
You can then create a page interaction on your master that causes the dynamic panel to display the appropriate panel state according to the variable you’ve set, as shown in Figure 4.
Figure 4—Master code
Now, when you generate a prototype, the state of the versionVariable controls the display of the panels. As an alternative, you can set up the prototype so your client can control which version they see. In this case, a user action on the first page instead sets the variable—for example, a radio button selection using an OnClick action—while the rest of the code remains the same.
Summary
Employing a reuse-based approach to prototype development means you must make a slightly greater initial investment when developing your prototypes to gain much greater power and flexibility in responding to changing requirements. Component-based reuse speeds prototype development, freeing you up to focus on the creative aspects of design.
The great thing about component reuse is that you don't need to sit down and develop your master prototype all at once. As a starting point, you can import masters from prototypes that you have already developed, then adapt or revise them as you go along. If you’re part of a small UX design team, component-based prototyping helps to ensure greater consistency across your team member’s deliverables. Masters, once you’ve set them up correctly, help your team maintain a consistent design approach. On the other hand, for a solo practitioner, a component-based approach to prototyping is essential in maximizing your efficiency.
Peter has been actively involved in Web design and development since 1993, working in the defense and telecommunications industries; designing a number of interactive, Web-based systems; and advising on usability. He has also worked in education, in both industry and academia, designing and delivering both classroom-based and online training. Peter is a Director at Edgerton Riley, which provides UX consultancy and research to technology firms. Peter has a PhD in software component reuse and a Bachelors degree in human factors, both from Loughborough University, in Leicestershire, UK. He has presented at international conferences and written about reuse, eLearning, and organizational design. Read More