This is a sample chapter from the book Communicating the UX Vision: 13 Anti-Patterns That Block Good Ideas, by Martina Schell and James O’Brien. 2015 Morgan Kaufmann.
Chapter 16: Group Design Techniques
To get you started with group design workshop formats, we have collected our most-used techniques for building better products and services with the whole team. There are hundreds of great workshop formats that could easily fill another book, so this is just a small selection of group design formats that we use most often in our day-to-day design practices.
Facilitating a group can be challenging and mentally exhausting. If you are new to facilitation, start small and find a partner who can support you—another member of your creative group can be a great backup or give you the ability to split the group into two for some tasks, so you can concentrate on a smaller number of people.
Champion Advertisement
Continue Reading…
How Many People to Invite?
With all group exercise formats, consider how many people you are inviting and make sure you have adequate space for them to participate.
As a rule of thumb, workshops get more challenging to facilitate as the number of attendees increases. The more voices in the room, the greater chance of one of those voices becoming dominating, vehemently disagreeing with another voice, refusing to engage with the process, or just using up the scheduled time in unfocused debate. When you’re starting out with group facilitation, you may want to try to keep the numbers at fewer than ten people, only increasing the numbers when you’re more comfortable with your skills.
When you’re confident in your facilitation skills, you’ll get the best results by inviting your whole project team, or at least key representatives from each area your team covers—development, product ownership, project management, design, etc. If you want fresh minds to contribute, consider opening the invite company wide, or ask your client to select a handful of people to add to the team. In larger organizations, limit the number of seats to fit your comfort level.
If you are breaking a larger group into teams, think about reconfiguring your space to make that grouping easier and explicit. For example, reserving a table per group encourages the attendees to self-organize naturally when the time comes to split the workshop up.
How Much Time to Budget?
Timebox all design activities quite aggressively—give them a fixed schedule and a fixed team size—and stick to your plan. Left uncontrolled, workshops have a tendency to degrade into circular discussions that suck up time and don’t resolve the question. Aggressively timeboxing activities is a way of both retaining control and preventing ungrounded “what-if” scenarios from taking over. Make sure each activity is time-budgeted tightly enough that the participants won’t feel they can afford to go off-course. As the workshop facilitator, it’s your job to be the timekeeper.
If you are facilitating for a large crowd or leading a noisy format, consider using a fun way to signal that time is up. A whistle, a gong, or whatever cheesy old game show sound you can find on your smartphone is a great way of getting attention.
Signal when the group has 5 minutes and then 1 minute left. Assess the group to see if they are in the middle of a very productive flow, or if they have completed less than 50% of the task, and offer a few extra minutes if this is the case.
How much time you need to run the workshop depends somewhat on how large your group is. How long does it take them to share ideas? If you consider 2 minutes per person for idea sharing and another 3 to 5 minutes for questions or discussion, you can roughly estimate how long the feedback portion of your workshop will be. Remember that many of the formats we discuss work in an iterative fashion, so you need to budget time for idea sharing and questions for each iteration.
How to Facilitate a Group
Be a great host!
Manage expectations in advance. Send invites with an explanation of what’s going to happen and what’s expected/not expected of each participant. Focus on brainstorming and idea generation. It’s important to convey that people don’t need artistic design skills to take part and that their ideas don’t have to be perfect solutions.
Food is usually a great motivator. Provide refreshments.
In the Room
Take the lead by welcoming everyone to the session and outlining what you have planned for the session.
Set the ground rules for the session: All ideas are good ideas; sketching is not about artistic expression but illustrating your point. If doubts arise about “not being able to draw,” consider this quick exercise: imagine that you want to explain what a cat is to someone who doesn’t speak your language. Can you get your point across with pen and paper?
Set your timeboxes and be the timekeeper, or appoint someone in the room to call time for each part of the exercise.
Explain the context. Introduce your project and any useful information you have already gathered. Perhaps you already have personas, or a gnarly problem to solve. Keep this short and have visual reminders available, if possible—for example, stick the personas on the wall). For larger groups, it’s helpful to put the exercise objective up on a screen to remind everyone of what’s asked of them.
If the participants haven’t worked together before, break the ice with a quick warm-up exercise. For example, ask everyone to go around the table and give their name, job title, and an unusual fact about themselves. Even if only one participant is new, this will help to make them feel they can contribute to the group.
Make sure you give everyone in the room a voice. You can make that inherent to the exercise (everyone gets to write, sketch, vote) or moderate the discussion by asking individuals who are quieter for their input.
If the conversation gets sidetracked, take a note of the issue, create a “parking lot” section on the wall and stash it there. Suggest taking this topic offline since it’s detracting too much time away from the task and focus of the session: “That’s a really great point, but with one eye on time, can we capture it and take it offline? Otherwise, it’ll open up a rabbit-hole that will drag us way off course in this session.”
Make sure there’s an action point at the end of the session to address the parking lot with whoever is involved. You can also apply this technique when a difficult personality railroads the conversation. Acknowledge their point of view and ask to pick up on that topic outside the session. If the issue overtakes an idea generated in the session, remind everyone of the ground rules that all ideas are good ideas, and that we are not to judge in the idea-generation process.
Try Out New Formats
If you are interested in exploring different design exercises, we recommend Gamestorming by Dave Gray, Sunni Brown, and James Macanufo [1] as a great starting point.
Elevator Pitch
An elevator pitch is a one-sentence statement that captures the unique value proposition of your product or service, designed to give a 30-second introduction to your goal for the product. The idea is to express the concept in the time it would take to talk about it during an elevator ride.
Best for
Focusing the proposition of a product/service
Participants
The whole team can participate.
Time
45 minutes
Resources
Ways to capture ideas in the room—whiteboard or easel pad.
A room to focus the group, with enough space for lively discussion
A room with a door to close, to facilitate lively group discussion, and to keep the hustle and bustle of the workplace out to help the team focus
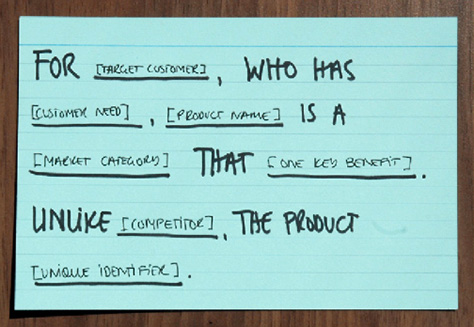
An outline of an elevator pitch statement, shown in Figure 16.1, would be: “For [target customer], who has [customer need], [product name] is a [market category] that [one key benefit]. Unlike [competition], the product [unique differentiator].”
Figure 16.1—How to construct an elevator pitch
(Photo credit: Martina Hodges-Schell.)
The exercise
Explain the elevator pitch concept. Make the outline of an elevator pitch available in the room (projected or on the wall). Go through each blank in the outline and have a group exploration of what words best describe the service. Expect to adjust these several times before the group feels that you’ve created the right statement together.
Outcome
This is your guiding principle throughout design and evaluation of the product or service.
Business Model Canvas
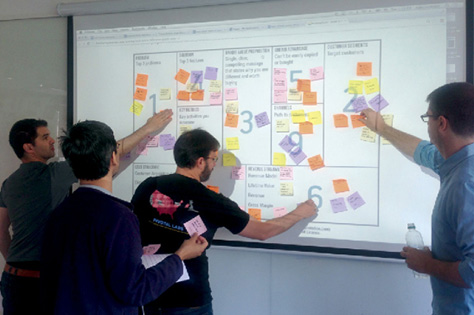
The Business Model Canvas, shown in Figure 16.2, was developed by Alex Osterwalder [2] to help businesses and startups create better business structures. It structures nine core elements of a business model and their interrelationships on a worksheet. Visualizing how your product creates value for the business and users is a great tool to bring everyone together around a shared view of how you will deliver this value.
Exposing all core elements that deliver a great experience and highlight the relationship between core business and UX elements; this can be an eye-opener for designers and other stakeholders alike. Also best for facilitating a conversation about what is needed to deliver a great experience.
Participants
A mix of business, technology, and design people
Time
90 minutes
Resources
Large printout or sketch on whiteboard of Business Model Canvas
Whiteboard markers
Sticky notes
The exercise
Introduce the team to the Business Model Canvas. Walk through each section and explain what information is captured in each.
Customer segments
Value proposition
Channels
Customer relationship
Revenue streams
Key resource
Key activities
Key partnerships
Cost structure
Have the team fill out and together prioritize each section. Does the sum of all parts make sense to the business, to the users? Are we creating value for the business and for users? Does it align with our vision? Where are the blank spots? What hasn’t been considered yet?
Outcomes
A set of key assumptions to be investigated or tested
A set of key areas that hadn’t been considered yet in delivering this service
Design the Box
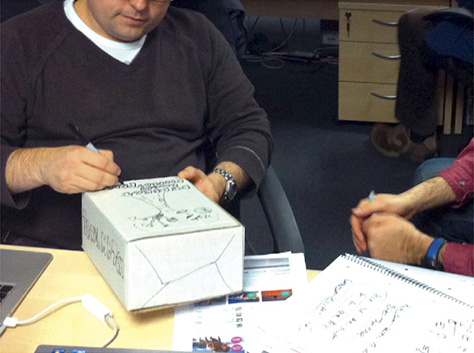
Sometimes it’s hard to make a decision. Designing a notional box for your product to ship in can help focus the team’s minds on which direction is the right one, as Figure 16.3 shows.
Figure 16.3—Creating a box for your product. How will it stand out on the shelf?
(Photo credit: Martina Hodges-Schell.)
You can either take all boxes created by individual teams for inspiration, or use this exercise to create consensus and create one version of the box together after each team has explored its version.
Best for
Focusing the team on what’s important
Participants
At least three or four people
Time
45 minutes
Resources
Actual plain packaging boxes (These can be bought cheaply in office-supply stores and are the best option. You can use plain paper, or even Sticky notes on old cereal boxes, but it’s harder to make your participants recognize the constraints of a real-world package when you use these.)
Marker pens in several different colors
An ice-breaker (This classic YouTube video from 2006 muses about how Microsoft would redesign the iPod packaging and is great for giving everyone a quick intro to packaging design, as well as demonstrating what this exercise is trying to avoid!)
The exercise
Split the group into small teams and give each the task of designing the physical packaging of the product/service you are creating. What is the key message that would make a customer buy this thing? What else would help them make a decision? What reassurance should you give them?
Give each team 15 minutes to create their box. Give each team 3 minutes for to share their creation. If the results are very different, an optional last step is to create one box with everyone’s input that brings together priorities.
Outcome
A clearer picture of priorities and a core focus for the product you are designing
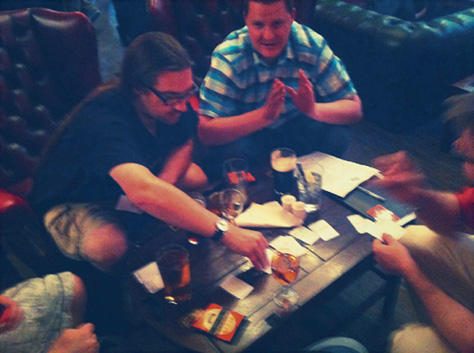
Role-Playing a Service
Whether you are designing a simple user interface or a more complex service proposition—before you start putting pen to paper it can be very insightful to play out the interaction a user may have with this interface or service. You are given the opportunity to explore the natural flow of the conversation between the user and your service, or even evaluate different contextual devices and inputs. Figure 16.4 shows a team role-playing a service.
Figure 16.4—Role play how users experience your service
(Photo credit: James O’Brien.)
Best for
Exploring what an experience should or could be like for users, instilling the team with a human-centered point of view, especially when there are a lot of system-centric thinkers driving decisions
Participants
The more, the merrier
Time
1 hour
Resources
A camera phone available to video the role-play, if possible. Otherwise, document whatever ideas you generate.
The exercise
Group the participants in pairs or as many actors as the system may have. One person in each or as many actors as the system may have takes the role of a user, while the other takes the role of the system itself—for example, the login flow. The pair acts out how a user experiences an interaction with the system. This can be open or closed. In open role-play, the person acting out the system has freedom in how they respond, allowing the interactions to evolve. This is good early on in system design.
In closed role-play, the person acting out the system can only respond with the messages that already exist in the user’s view—for example, error messages from the form). This is useful for identifying possible usability traps.
Outcome
Ideas captured to be explored further
Map the Experience
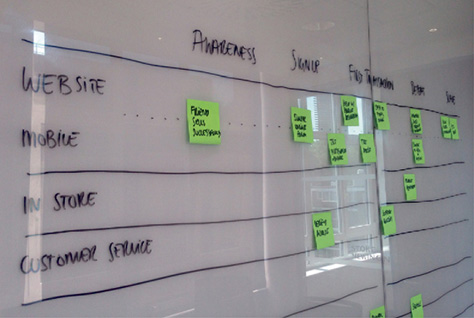
Experience mapping is a great exercise for getting an overview of all steps in a user’s lifecycle with your service, across all touchpoints. It can help you explore current painpoints and future improvements for the whole service from your customers’ perspective. In Figure 16.5, a team is mapping an experience across the customer journey and service touchpoints.
Figure 16.5—Mapping the experience across customer journey and service touchpoints
(Photo credit: Martina Hodges-Schell.)
Best for
Creating a picture of all the touchpoints in a user’s experience of your service. Great for a collective view of what’s going on right now, and also to map the future experience you want your users to have.
Participants
Three to twelve (Can get unwieldy with more than twelve participants.)
Time
90 minutes
Resources
Brown craft paper by the roll
Plenty of Sticky notes
Marker pens
The exercise
Divide the paper scroll on the wall into user life-cycle steps along the x axis and different channels on the y axis. Get the team to help you gather the complete picture.
If the goal is to understand what is happening in the whole ecosystem today, get everyone to map out touchpoints onto Sticky notes and add them to the map.
If the goal is to ideate a new experience, get the team to map the ideal experience across touchpoints. Encourage them to consider the experience from their users’ views, not current business or technology constraints.
Outcome
A high level overview for how your customers experience your service. Prioritize high-risk or high-value workflows in the overall system to explore more deeply.
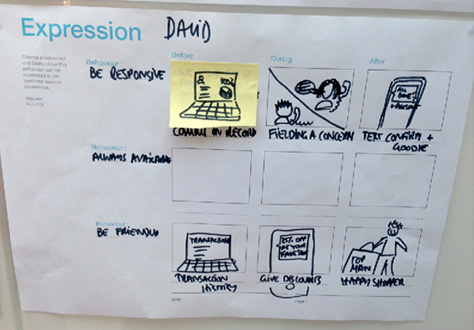
Storyboard Scenarios
Storyboards are a visual technique borrowed from film making to explore a narrative for a user scenario. It illustrates the user context and why, where, and how they might interact with a service. Storyboarding helps us indicate what a person might do, and how we can help, to fulfill their goals. Figure 16.6 shows a team creating a storyboard for user scenarios.
Figure 16.6—Creating a storyboard for user scenarios
(Photo credit: Martina Hodges-Schell.)
Best for
Illustrating how your product fits into the goals your audience is trying to achieve
Creating a shared understanding of user-centric workflows that can be derived from these scenarios
Building a design through user journeys rather than page-by-page
Participants
Equally effective with small or larger groups. Divide large groups into smaller teams of three to five.
Time
30 minutes (Multiply for a larger number of scenarios.)
Resources
Printed-out storyboard templates
Marker pens
Dots for voting (small, round stickers are best, but you can use marker pen dots in a pinch)
Space and means to stick idea sheets up on the wall
Printout or sketch of persona(s)
The exercise
Introduce your personas to the group. Highlight challenges and goals. Ask each team to pick a scenario to work through. Give them marker pens and a stack of storyboard templates to sketch out how users achieve their goals and how the idea fits into their lifestyles.
Leave time for each group to share its storyboard. Vote on ideas to take forward and explore further.
Outcome
A great starting point for designing out each step in a workflow instead of designing a system page by page
Instant testable prototype by addressing a whole user journey
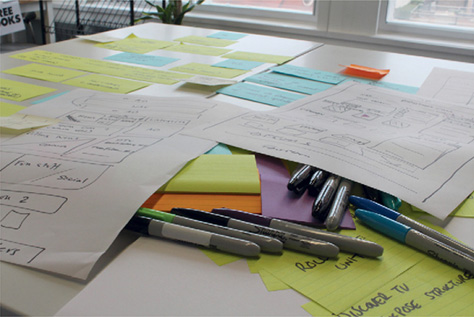
Design Studio
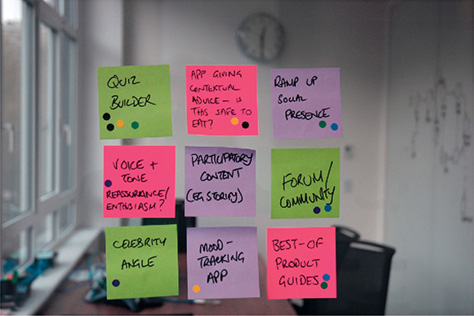
Design studio is a collaborative ideation workshop format devised to explore design challenges and generate many ideas in a short space of time. Small teams sketch, present, critique, and refine their ideas in quick iterations. Figure 16.7 depicts artifacts from a design studio workshop.
Figure 16.7—Generating ideas in a design studio workshop
(Photo credit: James O’Brien.)
Best for
Generating lots of ideas
Giving the whole team—and/or users—a voice in the design process
Getting noncreative stakeholders to empathize with design challenges
Participants
Minimum of three to four people (If more than six, divide them into groups. Invite your whole team. Also good with groups of users.)
Time
90 minutes (Add more time for larger groups.)
Resources
Several 6-up sketch templates per participant
Several 1-up sketch templates per participant
Marker pens
Dots for voting (Small, round stickers are best, but marker pen dots will do in a pinch.)
Space and means to stick up idea sheets on the wall
Printout or sketch of persona(s)
The exercise
Declare goals
Set the scene with the topic of exploration. (This could be a new platform, service, product, or feature.) Introduce who this is for (your personas) and what themes you may have already identified—that is, new search, new workflow.
Alternatively, if you want to capture topics for exploration, ask the group to provide topics—for example, “We are kicking off an evolution of product X. We’d like to hear from you what your most important issues are.”
6-up sketching
Start by getting everyone to pick a theme to work through. Ask them to quickly come up with six ways to solve this problem. You can repeat this exercise with a second or third topic to generate lots of ideas. A strict timebox helps creativity at this stage by forcing participants not to focus too closely on irrelevant details.
Get everyone to quickly introduce their ideas and identify a particularly promising one.
1-up sketching
Take that promising idea and make a single-page sketch of it. This sketch can go into more detail to think through the idea some more. Again, share with the group and put up all ideas on the wall.
Dot Voting
Get the group to dot-vote to identify which ideas to explore further.
Outcome
A set of ideas to inspire your design process and test out promising ideas with users quickly to validate these early assumptions
Moodboarding for personas
Having trouble with the user-centered point of view in your team? Create moodboards of the service for each persona—that is, through their eyes, not the team members’ standpoint. Figure 16.8 shows the creation of a mood board.
Figure 16.8—See the world through your personas’ eyes with mood boards
(Photo credit: Martina Hodges-Schell.)
Best for
Helping the team adopt a user-centered point of view
Participants
Up to twelve (You need quite a bit of space for each participant to create a moodboard.)
Time
60–90 minutes
Resources
Large sheets of card or easel pads (Participants will create a poster-sized mood board for each persona.)
Scissors
A broad range of magazines to clip images from
Glue
Printouts of your persona(s)
The exercise
Bring your personas to the session and introduce them to the group. Get everyone to pick one persona to work with, or alternatively create a group per persona.
Ask the team to make a moodboard that reflects the persona. Next, ask them to also make a moodboard for what the persona expects from your product or service.
Get everyone together in the last 15 minutes of the session to share their creations and feedback.
Outcome
Posters you can display in your team work space to remind the team of the users’ expectations
Hypotheses Testing
Lean startup has taught us to validate our assumptions with users. Our ideas are hypotheses, and to test them means to design experiments that will give us a clear answer as to whether our ideas facilitate the desired user outcome we expected. In Figure 16.9, a team is creating prototypes to test their assumptions.
Figure 16.9—Creating quick prototypes to test your assumptions
(Photo credit: Martina Hodges-Schell.)
Best for
Testing ideas
Finding quick and easy ways to evaluate assumptions
Participants
Any group size will work. Divide groups of six or more into teams.
Time
Depending on number of ideas, about two hours. This is a hands-on design session, so give it some space.
Resources
White wall
Paper
Marker pens
Sticky notes
Optionally, a computer for lo-fi prototyping [3]
The exercise
Get each team to come up with ideas for how to test one of the assumptions you have about your product right now.
Ask the group to consider: What’s our riskiest assumption? How can we test it with least time and resources? Where do we find participants?
Get the group to be creative. Encourage them to think smaller, with tools that are already available. Do we need to build anything at all?
Happy hacking.
Outcome
A set of agreed-upon hypotheses that can be tested with real users to inform product development, iteration, or a pivot
Retrospectives
A retrospective is a team meeting that looks back at recent project events and, without blame, tries to discover what lessons can be learned, actions that can be taken, and what worked well to improve the team work for the next iteration.
We recommend that you schedule retrospectives into your workflow in weekly (or once-per-sprint) cycles. Some teams schedule retrospectives only at the end of a project, but, in our experience, these typically take longer or can only focus on fewer points, and learnings can only be applied to the next project.
Rinse and repeat regularly! Retrospectives help you and your team make your working environment even greater. The name might suggest post-project analysis, but is much more effective to be built in on a weekly basis. The issues that arise are easier to tackle and the team has a regular outlet for praise.
Best for
Reviewing the working process and outcome
A feedback session on how the project is going and how everyone is doing, what is working well, and what needs addressing
Participants
Everyone who has worked on the project. It is important not to exclude anyone, or allow anyone to exclude themselves—if someone is too busy to attend a retrospective, there’s a problem that the retrospective should be dealing with.
Time
An hour, more or less (If you run retrospectives regularly throughout the project, they take less time and negative sentiments don’t have time to build up.)
Resources
Sticky notes for everyone
Marker pens
(Categories on the wall)
The exercise
Begin by encouraging everyone to interact positively in the retrospective. Have everyone repeat the Retrospective Prime Directive out loud:
“Regardless of what we discover, we understand and truly believe that everyone did the best job they could, given what they knew at the time, their skills and abilities, the resources available, and the situation at hand.”
Saying it out loud really does make a difference—it shifts the tone of the retrospective away from the potential of blame and recrimination to discovery and learning.
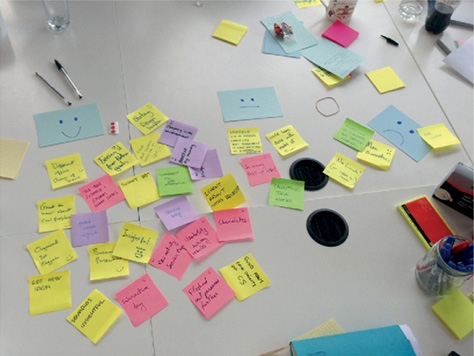
Have 10 minutes for everyone to note down their ‘great,’ ‘meh,’ and ‘not so great’ points on a sticky note each, as shown in Figure 16.10.
Get them all on the wall, in categories.
Have a facilitator pick off a point from each category in turn and discuss with the group. (You can use dot voting to prioritize.)
Note down any action points that arise, and find an owner for each who will commit to moving them forward for the next retrospective.
Figure 16.10—Reviewing the good, meh, and ugly
(Photo credit: Martina Hodges-Schell.)
Outcomes
Action points on key issues that are slowing the team down (These should be checked-in on at the next retrospective, or addressed with the setup of the next project.)
How to Prioritize
It’s important to get the group to prioritize ideas generated so you focus maximum energy on the ones with the best likelihood of success. Working through structured processes also helps keep the decision making more objective.
Dot Voting
Dot voting is a simple and effective way for small and large groups to cast their votes. Put each item for discussion on an individual sticky note. Give each participant three votes in the form of small round stickers (dots) and have everyone stick their dots on their preferred item, as shown in Figure 16.11.
Figure 16.11—Quick and effective prioritization with dot voting
(Photo credit: Martina Hodges-Schell.)
Participants can either use one dot per idea they like, or identify the riskiest assumption to call out, or they can use multiples per idea. There is no rule against voting for your own ideas.
If ideas are laid out on the table and not on the wall, individually wrapped chocolates are a fun and efficient way to dot-vote. (But take a photo of the table, because the “votes” will disappear at the end of the meeting.) If small, round stickers are hard to come by in your organization, marker pen dots will do the job, too.
Prioritization Matrix
You also can get the group to organize ideas on a two-by-two grid. The axes can be specified to reflect your goals, such as how relevant to users and how easy to make. This would result in sectors with Easy & High User Value, Hard & High User Value, Easy & Low User Value, and Hard & Low User Value.
Expressing priorities in this way helps the business understand more of the implications of the features they are choosing and focus on the most valuable ideas. Pet projects of the person with the loudest voice or the biggest paycheck can be tested and included in the priorities on merit.
Discount for UXmatters Readers—Buy Communicating the UX Vision: 13 Anti-Patterns That Block Good Ideas and other Morgan Kaufmann titles from the Elsevier store online, using the discount code PBTY15, through December 31, 2015, and save 25% off the retail price.
Additional Resource
Sherwin, D. Creative Workshop: 80 Challenges to Sharpen your Design Skills. Cincinnati, OH: HOW Books, F&W Media, 2010.
References
[1] Gray, D., S. Brown, and J. Macanufo. Gamestorming: A Playbook for Innovators, Rulebreakers, and Changemakers. Sebastopol, CA: O’Reilly Media, 2010.
[2] Osterwalder, A., and Y. Pigneur. Business Model Generation: A Handbook for Visionaries, Game Changers, and Challengers. Hoboken, NJ: John Wiley & Sons, 2010.
Martina is a User Experience consultant with over 15 years of experience in interactivity for the Web, desktop, TV, and mobile devices. She specializes in user-centered design, experience strategy, and qualitative design research. Martina helps Fortune 100 and start-up companies across a wide range of sectors develop new products and services or measurably improve existing ones. She holds an MA in Applied Imagination from Central Saint Martins, where she conducted research into methods for multidisciplinary collaboration to support creativity and innovation. An active participant in the UX community, Martina co-founded UX Tuesday, mentors at Method Design Lab and Seedcamp to bring UX expertise to startups, serves on the UK UXPA committee, and regularly organizes and speaks at events. She is co-author, with James O’Brien, of Communicating the UX Vision: 13 Anti-Patterns That Block Good Ideas.Read More
A UX designer and experienced agile practitioner, James loves creating exceptional digital products. You’ll often find him on Twitter, complaining about the frustrations that get in his way. Over the last ten years, he’s worked with agencies, enterprise code shops, and independent startups—always preaching the importance of designing for the user. James lives on a rusty Dutch barge that is moored by Tower Bridge. He doesn’t do anything in his spare time because he lives on a rusty Dutch barge, so never gets any. He is co-author, with Martina Schell, of Communicating the UX Vision: 13 Anti-Patterns That Block Good Ideas.Read More
 To get you started with group design workshop formats, we have collected our most-used techniques for building better products and services with the whole team. There are hundreds of great workshop formats that could easily fill another book, so this is just a small selection of group design formats that we use most often in our day-to-day design practices.