An interaction pattern is a generalized high-level interaction concept that can be used over and over again across different applications to achieve common user goals. The interaction patterns here are intended to describe common approaches to general VR (Virtual Reality) interaction concepts at a high level. Note interaction patterns are different from software design patterns that many system architects are familiar with. Interaction patterns are described from the user’s point of view, are largely implementation independent, and state relationships / interactions between the user and the virtual world along with its perceived objects.
An interaction technique is more specific and more technology dependent than an interaction pattern. Different interaction techniques that are similar are grouped under the same interaction pattern. For example, the walking pattern covers several walking interaction techniques ranging from real walking to walking in place. The best interaction techniques consist of high-quality affordances, signifiers, feedback, and mappings that result in an immediate and useful mental model for users.
Champion Advertisement
Continue Reading…
Distinguishing between interaction patterns and interaction techniques is important for multiple reasons [Sedig and Parsons 2013].
There are too many existing interaction techniques with many names and characterizations to remember, and many more will be developed in the future.
Organizing interaction techniques under the umbrella of a broader interaction pattern makes it easier to consider appropriate design possibilities by focusing on conceptual utility and higher-level design decisions before worrying about more specific details.
Broader pattern names and concepts make it easier to communicate interaction concepts.
Higher-level groupings enable easier systematic analysis and comparison.
When a specific technique fails, then other techniques within the same pattern can be more easily thought about and explored, resulting in better understanding of why that specific interaction technique did not work as intended.
Both interaction patterns and interaction techniques provide conceptual models to experiment with, suggestions and warnings of use, and starting points for innovative new designs. Interaction designers should know and understand these patterns and techniques well so they have a library of options to choose from depending on their needs and a base to innovate upon. Do not fall into the trap that there is a single best interaction pattern or technique. Each pattern and technique has strengths and weaknesses depending on application goals and the type of user [Wingrave et al., 2005]. Understanding distinctions and managing trade-offs of different techniques is essential to creating high-quality interactive experiences.
This chapter divides VR interaction patterns into selection, manipulation, viewpoint control, indirect control, and compound patterns. The interaction patterns and their interaction techniques are organized as follows:
Selection Patterns (Section 28.1)
Hand Selection Pattern
Pointing Pattern
Image-Plane Selection Pattern
Volume-Based Selection Pattern
Manipulation Patterns (Section 28.2)
Direct Hand Manipulation Pattern
Proxy Pattern
3D Tool Pattern
Viewpoint Control Patterns (Section 28.3)
Walking Pattern
Steering Pattern
3D Multi-Touch Pattern
Automated Pattern
Indirect Control Patterns (Section 28.4)
Widgets and Panels Pattern
Non-Spatial Control Pattern
Compound Patterns (Section 28.5)
Pointing Hand Pattern
World-in-Miniature Pattern
Multimodal Pattern
More specific example interaction techniques are described for each interaction pattern.
The first four patterns are often used sequentially—for example, a user may travel toward a table, select a tool on the table, and then use that tool to manipulate other objects on the table—or can be integrated together into compound patterns. Interaction techniques that researchers and practitioners have found to be useful are then described within the context of the broader pattern. These techniques are only examples, as many other techniques exist, and such a list could never be exhaustive. The intent for describing these patterns and techniques is for readers to directly use them, to extend them, and to serve as inspiration for creating entirely new ways of interacting within VR.
28.1 Selection Patterns
Selection is the specification of one or more objects from a set in order to specify an object to which a command will be applied, to denote the beginning of a manipulation task, or to specify a target to travel toward [McMahan et al., 2014]. Selection of objects is not necessarily obvious in VR, especially when most objects are located at a distance from the user. Selection patterns include the Hand Selection Pattern, Pointing Pattern, Image-Plane Selection Pattern, and Volume-Based Selection Pattern. Each has advantages over the others depending on the application and task.
28.1.1 Hand Selection Pattern
Related Patterns
Direct Hand Manipulation Pattern (Section 28.2.1) and 3D Tool Pattern (Section 28.2.3).
Description
The Hand Selection Pattern is a direct object-touching pattern that mimics real-world interaction—the user directly reaches out the hand to touch some object and then triggers a grab—for example, pushing a button on a controller, making a fist, or uttering a voice command.
When to Use
Hand selection is ideal for realistic interactions.
Limitations
Physiology limits a fully realistic implementation of hand selection—the arm can only be stretched so far and the wrist rotated so far—to those objects within reach (personal space), requiring the user to first travel to place himself close to the object to be selected. Different user heights and arm lengths can make it uncomfortable for some people to select objects that are at the edge of personal space. Virtual hands and arms often occlude objects of interest and can be too large to select small items. Nonrealistic hand selection techniques are not as limiting.
Exemplar Interaction Techniques
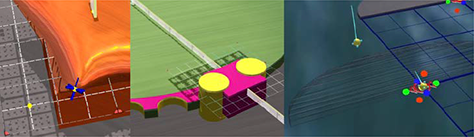
Realistic hands. Realistic hands are extremely compelling for providing an illusion of self-embodiment. Although ideally the entire arm would be tracked, inverse kinematics can estimate the pose of the arm quite well where users typically don’t notice differences in arm pose if the head and/or torso is tracked along with the hand. Figure 28.1, left, shows an example from the viewpoint of a user who has grabbed a bottle, on the left; semi-realistic hands with no arms, at the center; and abstract hands, on the right.
Figure 28.1—Three degrees of realism for hand selection
Image sources: Left, Cloudhead Games; center, NextGen Interactions; right, Digital ArtForms
Modeling users—for example, measuring arm length—and placing objects within a comfortable range depending on the measured arm length is ideal. However, Digital ArtForms found no complaints from ages ten to adult in a semi-immersive world after setting a single arm-length scale value that was reasonable for the entire range of body sizes.
Non-realistic hands. Hands do not need to necessarily look real, and trying to make hands and arms realistic can limit interaction. Non-realistic hands does not try to mimic reality but instead focuses on ease of interaction. Often hands are used without arms (Figure 28.1, center) so that reach can be scaled to make the design of interactions easier. Although the lack of arms can be disturbing at first, users quickly learn to accept having no arms. The hands also need not look like hands. For abstract applications, users are quite accepting of abstract 3D cursors (Figure 28.1, right) and still feel like they are directly selecting objects. Such hand cursors reduce problems of visual occlusion. Hand occlusion can also be mitigated by making the hand transparent—although proper transparency rendering of multiple objects can be technically challenging to do correctly.
Go-go technique. The go-go technique [Poupyrev et al., 1996] expands upon the concept of a non-realistic hand by enabling one to reach far beyond personal space. The virtual hand is directly mapped to the physical hand when within two-thirds of the full arm’s reach and when extended further, the hand grows in a nonlinear manner enabling the user to reach further into the environment. This technique enables closer objects to be selected and manipulated with greater accuracy while allowing further objects to be easily reached. Physical aspects of arm length and height have been found to be important for the go-go technique, so measuring arm length should be considered when using this technique [Bowman 1999]. Measuring arm length can be done by simply asking the user to hold out the hands in front of the body at the start of the application. Bowman and Hodges [1997] describes extensions to the go-go technique, such as providing rate control—that is, velocity—options that enable infinite reach, and compares these to pointing techniques. Non-isomorphic hand rotations (Section 28.2.1) are similar but scale rotations instead of position for manipulation.
28.1.2 Pointing Pattern
>
Related Patterns
Widgets and Panels Pattern (Section 28.4.1) and Pointing Hand Pattern (Section 28.5.1).
Description
The Pointing Pattern is one of the most fundamental and often-used patterns for selection. The Pointing Pattern extends a ray into the distance and the first object intersected can then be selected via a user-controlled trigger. Pointing is most typically done with the head—for example, a cross-hair in the center of the field of view—or a hand/finger.
When to Use
The Pointing Pattern is typically better for selection than the Hand Selection Pattern unless realistic interaction is required. This is especially true for selection beyond personal space and when small hand motions are desired. Pointing is faster when speed of remote selection is important [Bowman 1999], but is also often used for precisely selecting close objects, such as pointing with the dominant hand to select components on a panel (Section 28.4.1) held in the non-dominant hand.
Limitations
Selection by pointing is usually not appropriate when realistic interaction is required. (The exception might be if a laser pointer or remote control is being modeled.)
Straightforward implementations result in difficulty selecting small objects in the distance. Pointing with the hand can be imprecise due to natural hand tremor [Bowman 1999]. Object snapping and precision mode pointing described below can mitigate this problem.
Exemplar Interaction Techniques
Hand pointing. When hand tracking is available, hand pointing with a ray extending from the hand or finger is the most common method of selection. The user then provides a signal to actually select the item of interest—for example, a button press or gesture with the other hand.
Head pointing. When no hand tracking is available, selection via head pointing is the most common form of selection. Head pointing is typically implemented by drawing a small pointer or reticle at the center of the field of view so the user simply lines up the pointer with the object of interest and then provides a signal to select the object. The signal is most commonly a button press but when buttons are not available then the item is often selected by dwell selection—that is, by holding the pointer on the object for some defined period of time. Dwell selection is not ideal due to having to wait for objects to be selected and accidental selection when looking at an object of interest.
Eye gaze selection. Eye gaze selection is a form of pointing implemented with eye tracking. The user simply looks at an item of interest and then provides a signal to select the looked-at object. In general, eye gaze selection is typically not a good selection technique, primarily due to the Midas Touch problem.
Object snapping. Object snapping [Haan et al., 2005] works by objects having scoring functions that cause the selection ray to snap/bend toward the object with the highest score. This technique works well when selectable objects are small and/or moving.
Precision mode pointing. Precision mode pointing [Kopper et al., 2010] is a nonisomorphic rotation technique that scales down the rotational mapping of the hand to the pointer, as defined by the control/display (C/D) ratio. The result is a slow motion cursor that enables fine pointer control. A zoom lens can also be used that scales the area around the cursor to enable seeing smaller objects, but the zoom should not be affected by head pose unless the zoom area on the display is small. The user can control the amount of zoom with a scroll wheel on a hand-held device.
Two-handed pointing. Two-handed pointing originates the selection at the near hand and extends the ray through the far hand [Miné et al., 1997]. This provides more precision when the hands are further apart and fast rotations about a full 360° range when the hands are closer together—whereas a full range of 360° for a single hand pointer is difficult due to physical hand constraints. The distance between the hands can also be used to control the length of the pointer.
28.1.3 Image-Plane Selection Pattern
Also Known As
Occlusion and Framing.
Related Pattern
World-in-Miniature Pattern (Section 28.5.2).
Description
The Image-Plane Selection Pattern uses a combination of eye position and hand position for selection [Pierce et al., 1997]. This pattern can be thought about as the scene and hand being projected onto a 2D image plane in front of the user—or on the eye. The user simply holds one or two hands between the eye and the desired object and then provides a signal to select the object when the object lines up with the hand and eye.
When to Use
Image-plane techniques simulate direct touch at a distance, thus are easy to use [Bowman et al., 2004]. These techniques work well at any distance as long as the object can be seen.
Limitations
Image-plane selection works for a single eye, so users should close one eye while using these techniques—or use a monoscopic display. Image-plane selection results in fatigue when used often due to having to hold the hand up high in front of the eye. As in the Hand Selection Pattern, the hand often occludes objects if not transparent.
Exemplar Interaction Techniques
Head crusher technique. In the head crusher technique, shown in Figure 28.2, the user positions his thumb and forefinger around the desired object in the 2D image plane. The inset shows the user’s view of selecting the chair.
Figure 28.2—The head crusher selection technique
Image source: Pierce et al., 1997
Sticky finger technique. The sticky finger technique provides an easier gesture—the object underneath the user’s finger in the 2D image is selected.
Lifting palm technique. In the lifting palm technique, the user selects objects by flattening his outstretched hand and positions the palm so that it appears to lie below the desired object.
Framing hands technique. The framing hands technique is a two-handed technique where the hands are positioned to form the two corners of a frame in the 2D image surrounding an object.
28.1.4 Volume-Based Selection Pattern
Related Patterns
3D Multi-Touch Pattern (Section 28.3.3) and World-in-Miniature Pattern (Section 28.5.2).
Description
The Volume-Based Selection Pattern enables selection of a volume of space—for example, a box, sphere, or cone—and is independent of the type of data being selected. Data to be selected can be volumetric (voxels), point clouds, geometric surfaces, or even space containing no data—for example, to follow with filling that space with some new data. Figure 28.3 shows how a selection box can be used to carve out a volume of space from a medical dataset. The blue user / avatar on the right has carved out a volume of space within a medical dataset via snapping, nudging, and reshaping a selection box—that is, the gray box in front of the green avatar. The green avatar near the center is stepping inside the dataset to examine it from within.
Figure 28.3—Selecting a volume of space
Image source: Digital ArtForms
When to Use
The Volume-Based Selection Pattern is appropriate when the user needs to select a not-yet-defined set of data in 3D space or to carve out space within an existing dataset. This pattern enables selection of data when there are no geometric surfaces—for example, medical CT datasets—whereas geometric surfaces are required for implementing many other selection patterns/techniques—for example, pointing requires intersecting a ray with object surfaces.
Limitations
Selecting volumetric space can be more challenging than selecting a single object with the other more common selection patterns.
Exemplar Interaction Techniques
Cone-casting flashlight. The cone-casting flashlight technique uses pointing, but instead of using a ray, a cone is used. This results in easier selection of small objects than standard pointing via ray casting. If the intent is a single object, then the object closest to the cone’s center line or the object closest to the user can be selected [Liang and Green 1994]. A modification of this technique is the aperture technique [Forsberg et al., 1996], which enables the user to control the spread of the selection volume by bringing the hand closer or further away.
Two-handed box selection. Two-handed box selection uses both hands to position, orient, and shape a box via snapping and nudging. Snap and nudge are asymmetric techniques where one hand controls the position and orientation of the selection box, and the second hand controls the shape of the box [Yoganandan et al., 2014]. Both snap and nudge mechanisms have two stages of interaction—grab and reshape. Grab influences the position and orientation of the box. Reshape changes the shape of the box.
Snap immediately brings the selection box to the hand and is designed to quickly access regions of interest that are within arm’s reach of the user. Snap is an absolute interaction technique, i.e., every time snap is initiated the box position/orientation is reassigned. Therefore, snap focuses on setting the initial pose of the box and placing it comfortably within arm’s reach.
Nudge enables incremental and precise adjustment and control of the selection box. Nudge works whether the selection box is near or far away from the user by maintaining the box’s current position, orientation, and scale for the initial grab, but subsequent motion of the box is locked to the hand. Once attached to the hand, the box is positioned and oriented relative to its initial state—because of this, nudge can be thought of as a relative change in box pose. The box can then be simultaneously reshaped with the other hand while holding down a button.
28.2 Manipulation Patterns
Manipulation is the modification of attributes for one or more objects such as position, orientation, scale, shape, color, and texture. Manipulation typically follows selection, such as the need to first pick up an object before throwing it. Manipulation Patterns include the Direct Hand Manipulation Pattern, Proxy Pattern, and 3D Tool Pattern.
28.2.1 Direct Hand Manipulation Pattern
Related Patterns
Hand Selection Pattern (Section 28.1.1), Pointing Hand Pattern (Section 28.5.1), and 3D Tool Pattern (Section 28.2.3).
Description
The Direct Hand Manipulation Pattern corresponds to the way we manipulate objects with our hands in the real world. After selecting the object, the object is attached to the hand moving along with it until released.
When to Use
Direct positioning and orientation with the hand have been shown to be more efficient and result in greater user satisfaction than other manipulation patterns [Bowman and Hodges 1997].
Limitations
Like the Hand Selection Pattern (Section 28.1.1), a straightforward implementation is limited by the physical reach of the user.
Exemplar Interaction Techniques
Non-isomorphic rotations. Some form of clutching is required to rotate beyond certain angles, and clutching can hinder performance due to wasted motion [Zhai et al., 1996]. Clutching can be reduced by using non-isomorphic rotations [Poupyrev et al., 2000] that allow one to control larger ranges of 3D rotation with smaller wrist rotation. Nonisomorphic rotations can also be used to provide more precision by mapping large physical rotations to smaller virtual rotations.
Go-go technique. The go-go technique (Section 28.1.1) can be used for manipulation as well as selection with no mode change.
28.2.2 Proxy Pattern
Related Patterns
Direct Hand Manipulation Pattern (Section 28.2.1) and World-in-Miniature Pattern (Section 28.5.2).
Description
A proxy is a local object—physical or virtual—that represents and maps directly to a remote object. The Proxy Pattern uses a proxy to manipulate a remote object. As the user directly manipulates the local objects, the remote objects is manipulated in the same way.
When to Use
This pattern works well when a remote object needs to be intuitively manipulated as if it were in the user’s hands or when viewing and manipulating objects at multiple scales—for example, the proxy object can stay the same size relative to the user even as the user scales himself relative to the world and remote object.
Limitations
The proxy can be difficult to manipulate as intended when there is a lack of directional compliance—that is, when there is an orientation offset between the proxy and the remote object.
Exemplar Interaction Technique
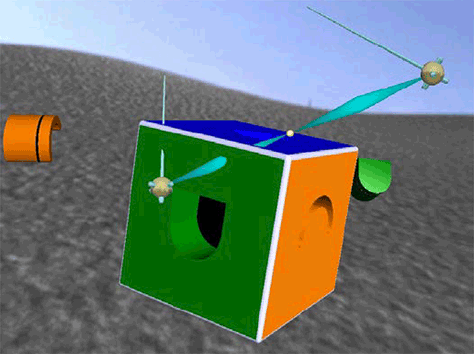
Tracked physical props. Tracked physical props are objects directly manipulated by the user—a form of passive haptics that map to one or more virtual objects and are often used to specify spatial relationships between virtual objects. Hinckley et al. [1998] describe an asymmetric, two-handed, 3D neurosurgical visualization system where the nondominant hand holds a doll’s head and the dominant hand holds a planar object or a pointing device, as shown in Figure 28.4. The doll’s head directly maps to a remotely viewed neurological dataset and the planar object controls a slicing plane to see inside the dataset. The pointing device controls a virtual probe. Such physical proxies provide direct action-task correspondence, facilitate natural two-handed interactions, provide tactile feedback to the user, and are extremely easy to use without requiring any training.
Figure 28.4—Proxy prop controlling orientation of neurological dataset
Image source: Hinckley et al., 1994
3D Tool Pattern
Related Patterns
Hand Selection Pattern (Section 28.1.1) and Direct Hand Manipulation Pattern (Section 28.2.1).
Description
The 3D Tool Pattern enables users to directly manipulate an intermediary 3D tool with their hands that in turn directly manipulates some object in the world. An example of a 3D tool is a stick to extend one’s reach or a handle on an object that enables the object to be reshaped.
When to Use
Use the 3D Tool Pattern to enhance the capability of the hands to manipulate objects. For example, a screwdriver provides precise control of an object by mapping large rotations to small translations along a single axis.
Limitations
3D tools can take more effort to use if the user must first travel and maneuver to an appropriate angle in order to apply the tool to an object.
Exemplar Interaction Techniques
Hand-held tools. Hand-held tools are virtual objects with geometry and behavior that are attached to/held with a hand. Such tools can be used to control objects from afar—like a TV remote control—or to work more directly on an object. A paintbrush used to draw on a surface of an object is an example of a hand-held tool. Hand-held tools are often easier to use and understand than widgets (Section 28.4.1) due to being more direct.
Object-attached tools. An object-attached tool is a manipulable tool that is attached/ colocated with an object. Such a tool results in a more coupled signifier representing the affordance between the object, tool, and user. For example, a color icon might be located on an object, and the user simply selects the icon at which point a color cube appears so the user can choose the color of the object. Or if the shape of a box can be changed, then an adjustment tool can be made available on the corners of the box—for example, dragging the vertex.
Jigs. Precisely aligning and modeling objects can be difficult with 6 DoF input devices due to having no physical constraints. One way to enable precision is to add virtual constraints with jigs. Jigs, similar to real-world physical guides used by carpenters and machinists, are grids, rulers, and other referenceable shapes that the user attaches to object vertices, edges, and faces. The user can adjust the jig parameters—for example, grid spacing—and snap other objects into exact position and orientation relative to the object the jig is attached to. Figure 28.5 shows some examples of jigs. In the image on the left, the blue, 3D cross-hairs represent the user’s hand. The user drags the lower-left corner of the orange object to a grid point. In the image at the center, the user cuts shapes out of a cylinder at 15° angles. In the image on the right, the user precisely snaps a wireframe-viewed object onto a grid. Jig kits support the snapping together of multiple jigs—for example, snapping a ruler to a grid—for more complex alignments.
Figure 28.5—Jigs used for precision modeling
Image sources: Digital ArtForms and Sixense
28.3 Viewpoint Control Patterns
Viewpoint control is the task of manipulating one’s perspective and can include translation, orientation, and scale. Travel is a form of viewpoint control that does not allow scaling.
Controlling one’s viewpoint is equivalent to moving, rotating, or scaling the world. For example, moving the viewpoint to the left is equivalent to moving the world to the right, or scaling oneself to be smaller is equivalent to scaling the world to be larger. Thus, users perceive themselves either as moving through the world (self-motion) or as the world moving around them (world motion) as the viewpoint changes.
Viewpoint Control Patterns include the Walking Pattern, Steering Pattern, 3D Multi-Touch Pattern, and Automated Pattern. Warning: Some implementations of these patterns may induce motion sickness and are not appropriate for users new to VR or those who are sensitive to scene motion. In many cases, sickness can be reduced by integrating the techniques with the suggestions in Part III.
Walking Pattern
Description
The Walking Pattern leverages motion of the feet to control the viewpoint. Walking within VR [Steinicke et al., 2013] includes everything from real walking to mimicking walking by moving the feet when seated.
When to Use
This pattern matches or mimics real-world locomotion and therefore provides a high degree of interaction fidelity. Walking enhances presence and ease of navigation [Usoh et al., 1999] as well as spatial orientation and movement understanding [Chance et al., 1998]. Real walking is ideal for navigating small to medium-size spaces, and such travel results in no motion sickness if implemented well.
Limitations
Walking is not appropriate when rapid or distant navigation is important. True walking across large distances requires a large tracked space, and for wired headsets cable tangling can pull on the headset and be a tripping hazard. A human spotter should closely watch walking users to help stabilize them if necessary. Fatigue can result with prolonged use, and walking distance is limited by the physical motion that users are willing to endure. Cable tangling is also an issue when using a wired system; often an assistant holds the wires and follows the user to prevent tangling and tripping.
Exemplar Interaction Techniques
Real walking. Real walking matches physical walking with motion in the virtual environment; the mapping from real to virtual is one-to-one. Because of high interaction fidelity, real walking is an ideal interface for many VR experiences. Real walking typically does not directly measure foot motion, but instead tracks the head. Real walking results in less motion sickness due to better matching visual and vestibular cues—although sickness can still result due to issues such as latency and system miscalibration. The motion of one’s feet in a self-embodied avatar can be estimated or the feet can be tracked to provide greater biomechanical symmetry. Unfortunately, real walking by itself limits travel in the virtual world to the physically tracked space.
Redirected walking. Redirected walking [Razzaque et al., 2001] is a technique that allows users to walk in a VR space larger than the physically tracked space. This is accomplished by rotation and translation gains that are different than the true motion of the user, directing the user away from the edges of tracked space—or physical obstacles. Ideally, the gains are below perceptible thresholds so that the user does not consciously realize he is being redirected.
Walking in place. Various forms of walking in place exist [Wendt 2010], but all consist of making physical walking motions—for example, lifting the legs—while staying in the same physical spot but moving virtually. Walking in place works well when there is only a small tracked area and when safety is a primary concern. The safest form of walking in place is for the user to be seated. Theoretically users can walk in place for any distance. However, travel distances are limited by the physical effort the users are willing to make. Thus, walking in place works well for small and medium-size environments where only short durations of travel are required.
The human joystick. The human joystick [McMahan et al., 2012] utilizes the user’s position relative to a central zone to create a 2D vector that defines the horizontal direction and velocity of virtual travel. The user simply steps forward to control speed. The human joystick has the advantage that only a small amount of tracked space is required—albeit more than walking in place.
Treadmill walking and running. Various types of treadmills exist for simulating the physical act of walking and running (Section 3.2.5). Although not as realistic as real walking, treadmills can be quite effective for controlling the viewpoint, providing a sense of self-motion, and walking an unlimited distance. Techniques should make sure foot direction movement is compliant with forward visual motion. Otherwise, treadmill techniques that lack directional and temporal compliance can be worse than no treadmill. Treadmills with safety harnesses are ideal, especially when physical running is required.
28.3.2 Steering Pattern
Description
The Steering Pattern is continuous control of viewpoint direction that does not involve movement of the feet. There is typically no need to control viewpoint pitch with controllers as is done with desktop systems since users can physically look up and down.
When to Use
Steering is appropriate for traveling great distances without the need for physical exertion. When exploring, viewpoint control techniques should allow continuous control, or at least the ability to interrupt a movement after it has begun. Such techniques should also require minimum cognitive load so the user can focus on spatial knowledge acquisition and information gathering. Steering works best when travel is constrained to some height above a surface, acceleration/deceleration can be minimized (Section 18.5), and real-world stabilized cues can be provided (Sections 12.3.4 and 18.2).
Limitations
Steering provides less biomechanical symmetry than the walking pattern. Many users report symptoms of motion sickness with steering. Virtual turning is more disorienting than physical turning.
Exemplar Interaction Techniques
Navigation by leaning. Navigation by leaning moves the user in the direction of the lean. The amount of lean typically maps to velocity. One advantage of this technique is no requirement for hand tracking. Motion sickness can be significant as velocity varies—that is, acceleration.
Gaze-directed steering. Gaze-directed steering moves the user in the direction she is looking. Typically, the starting and stopping motion in the gaze direction is controlled by the user via a hand-held button or joystick. This is easy to understand and can work well for novices or for those accustomed to first-person video games where the forward direction is identical to the look direction. However, it can also be disorienting as any small head motion changes the direction of travel, and frustrating since users cannot look in one direction while traveling in a different direction.
Torso-directed steering. Torso-directed steering—also called chair-directed steering when the torso is not tracked—utilized when traveling over a terrain, separates the direction of travel from the way one is looking. This has more interaction fidelity than gaze-directed steering since in the real world one does not always walk in the direction the head is pointed. In the case when the torso or chair is not tracked, a general forward direction can be assumed. This technique can have more of a nauseating effect if the user does not have a mental model of what the forward direction is or when the entire body is turned when the torso or chair is not tracked. Visual cues can be provided to help users maintain a sense of the forward direction.
One-handed flying. One-handed flying works by moving the user in the direction the finger or hand is pointing. Velocity can be determined by the horizontal distance of the hand from the head.
Two-handed flying. Two-handed flying works by moving the user in the direction determined by the vector between the two hands, and the speed is proportional to the distance between the hands [Miné et al., 1997]. A minimum hand separation is considered to be a dead zone where motion is stopped. This enables one to quickly stop motion by quickly bringing the hands together. Flying backward with two hands is more easily accomplished than one-handed flying—which requires an awkward hand or device rotation—by swapping the location of the hands.
Dual analog stick steering. Dual analog stick steering—also known as joysticks or analog pads—work surprisingly well for steering over a terrain—that is, forward/back and left/right. In most cases, standard first-person game controls should be used where the left stick controls 2D translation—pushing up/down translates the body and viewpoint forward/backward, pushing left/right translates the body and viewpoint left/right—and the right stick controls left/right orientation—pushing left rotates the body and viewing direction to the left and pushing right rotates the body and viewing direction to the right. This mapping is surprisingly intuitive and is consistent with traditional first-person video games—that is, gamers already understand how to use such controls so they have little learning curve.
Virtual rotations can be disorienting and sickness inducing for some people. Because of this, the designer might design the experience to have the content consistently in the forward direction so that no virtual rotation is required. Alternatively, if the system is wireless and the torso or chair is tracked, then there is no need for virtual rotations since the user can physically rotate 360°.
World-grounded steering devices. World-grounded input devices such as flight sticks or steering wheels are often used to steer through a world. Such devices can be quite effective for viewpoint control due to the sense of actively controlling a physical device.
Virtual steering devices. Instead of using physical steering devices, virtual steering devices can be used. Virtual steering devices are visual representations of real-world steering devices—although they do not actually physically exist in the experience—that are used to navigate through the environment. For example, a virtual steering wheel can be used to control a virtual vehicle the user sits in. Virtual devices are more flexible than physical devices as they can be easily changed in software. Unfortunately, virtual devices are difficult to control due to having no proprioceptive force feedback—although some haptic feedback can be provided when using a hand-held controller with haptic capability.
28.3.3 3D Multi-Touch Pattern
Related Patterns
World-in-Miniature Pattern (Section 28.5.2) and Volume-Based Selection Pattern (Section 28.1.4).
Description
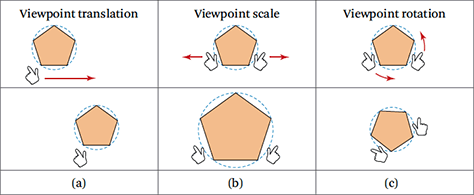
The 3D Multi-Touch Pattern enables simultaneous modification of the position, orientation, and scale of the world with the use of two hands. Similar to 2D multi-touch on a touch screen, translation via 3D multi-touch is obtained by grabbing and moving space with one hand (monomanual interaction) or with both hands (synchronous bimanual interaction). One difference from 2D multi-touch is that one of the most common ways of using 3D multi-touch is to walk with the hands by alternating the grabbing of space with each hand—like pulling on a rope but with hands typically wider apart. Scaling of the world is accomplished by grabbing space with both hands and moving the hands apart or bringing them closer together. Rotation of the world is accomplished by grabbing space with both hands and rotating about a point—typically, either about one hand or the midpoint between the hands. Translation, rotation, and scale can all be performed simultaneously with a single two-handed gesture.
When to Use
3D multi-touch works well for non-realistic interactions when creating assets, manipulating abstract data, viewing scientific datasets, or rapidly exploring large and small areas of interest from arbitrary viewpoints.
Limitations
3D multi-touch is not appropriate when the user is confined to the ground. 3D multi-touch can be challenging to implement as small nuances can affect the usability of the system. If not implemented well, 3D multi-touch can be frustrating to use. Even if implemented well, there can be a learning curve on the order of minutes for some users. Constraints, such as those that keep the user upright, limit scale, and/or disable rotations, can be added for novice users. When scaling is enabled and the display is monoscopic—or there are few depth cues—it can be difficult to distinguish between a small nearby object and a larger object that is further away. Therefore, visual cues that help the user create and maintain a mental model of the world and one’s place in it can be helpful.
Exemplar Interaction Techniques
Digital ArtForms’ Two-Handed Interface. Digital ArtForms has built a mature 3D multi-touch interface called THI (Two-Handed Interface) [Schultheis et al., 2012] based off of the work of Mapes and Moshell [1995] and Multigen-Paradigm’s SmartScene interface [Homan 1996] from the 1990s. Figure 28.6 shows a schematic for manipulating the viewpoint. Scale and rotation occur about the middle point between the two hands. Rotation of the world is accomplished by grabbing space with both hands and orbiting the hands about the midpoint between the hands, similar to grabbing a globe on both sides and turning it. Note this is not the same as attaching the world to a single hand as rotating with a single hand can be quite nauseating. Translation, rotation, and scale can all be performed simultaneously with a single two-handed gesture. In multi-user environments, other users’ avatars appear to grow or shrink as they scale themselves.
Figure 28.6—Translation, scale, and rotation with Two-Handed Interface
Image source: Digital ArtForms’ Two-Handed Interface from Mlyniec et al., 2011
Once learned, this implementation of treating the world as an object works well when navigation and selection/manipulation tasks are frequent and interspersed, since viewpoint control and object control are similar other than pushing a different button—that is, only a single interaction metaphor needs to be learned and cognitive load is reduced by not having to switch between techniques. This gives users the ability to place the world and objects of interest into personal space at the most comfortable working pose via position, rotation, and scaling operations. Digital ArtForms calls this posture and approach—similar to what Bowman et al. [2004] call maneuvering. Posture and approach reduces gorilla arm and users have worked for hours without reports of fatigue [Jerald et al., 2013]. In addition, physical hand motions are non-repetitive by nature and are reported not to be subject to repetitive stress due to the lack of a physical planar constraint as is the case with a mouse.
The spindle. Building a mental model of the point being scaled and rotated about along with visualizing intent can be difficult for new users, especially when depth cues are absent. A spindle, shown in Figure 28.7, consisting of geometry connecting the two hands—what Balakrishnan and Hinckley [2000] call visual integration—along with a visual indication of the center of rotation/scale dramatically helps users plan their actions and speeds the training process. The yellow dot between the two cursors is the point that is rotated and scaled about. Users simply place the center point of the spindle at the point they want to scale and rotate about, push a button in each hand, and pull/scale themselves toward it—or equivalently pull/scale the point and the world toward the user—while also optionally rotating about that point. In addition to visualizing the center of rotation/scale, the connecting geometry provides depth-occlusion cues that provide information of where the hands are relative to the geometry.
Figure 28.7—Two hand cursors and their connecting spindle
Image source: Schultheis et al., 2012
28.3.4 Automated Pattern
Description
The Automated Pattern passively changes the user’s viewpoint. Common methods of achieving this are by being seated on a moving vehicle controlled by the computer or by teleportation.
When to Use
Use when the user is playing the role of a passive observer as a passenger controlled by some other entity or when free exploration of the environment is not important or not possible—for example, due to limitations of today’s cameras designed for immersive film.
Limitations
The passive nature of this technique can be disorienting and sometimes nauseating—depending on implementation. This pattern is not meant to be used to completely control the camera independent of user motion. VR applications should generally allow the look direction to be independent from the travel direction so the user can freely look around even if other viewpoint motion is occurring. Otherwise significant motion sickness will result.
Exemplar Interaction Techniques
Reducing motion sickness. Motion sickness can be significantly reduced with this technique by keeping travel speed and direction constant—that is, keep velocity constant—providing world-stabilized cues, and creating a leading indicator so users know what motions to expect.
Passive vehicles. Passive vehicles are virtual objects users can enter or step onto that transport the user along some path not controlled by the user. Passenger trains, cars, airplanes, elevators, escalators, and moving sidewalks are examples of passive vehicles.
Target-based travel and route planning. Target-based travel [Bowman et al., 1998] gives a user the ability to select a goal or location he wishes to travel to before being passively moved to that location. Route planning [Bowman et al., 1999] is the active specification of a path between the current location and the goal before being passively moved. Route planning can consist of drawing a path on a map or placing markers that the system uses to create a smooth path.
Teleportation. Teleportation is relocation to a new location without any motion. Teleportation is most appropriate when traveling large distances, between worlds, and/or when reducing motion sickness is a primary concern. Fading out and then fading in a scene is less startling than an instantaneous change. Unfortunately, straightforward teleportation comes at the cost of decreasing spatial orientation—users find it difficult to get their bearings when transported to a new location [Bowman and Hodges 1997].
28.4 Indirect Control Patterns
Indirect Control Patterns provide control through an intermediary to modify an object, the environment, or the system. Indirect control is more abstract than selection, manipulation, and viewpoint control. Indirect control is ideal when an obvious spatial mapping does not exist or it is difficult to directly manipulate an aspect of the environment. Example uses include controlling the overall system, issuing commands, changing modes, and modifying non-spatial parameters.
Whereas the previously described techniques primarily describe both what should be done and how it is done, indirect control typically specifies only what should be done and the system determines how to do it. Because indirect control is not directly linked to that which it is controlling, signifiers such as the shape and size of controls, their visual representation and labeling, and apparent affordances of their underlying control structure are extremely important.
Indirect Control Patterns include the Widgets and Panels Pattern and Non-Spatial Control Pattern.
28.4.1 Widgets and Panels Pattern
Related Patterns
Hand Selection Pattern (Section 28.1.1), Pointing Pattern (Section 28.1.2), and Direct Hand Manipulation Pattern.
Description
The Widgets and Panels Pattern is the most common form of VR indirect control, and typically follows 2D desktop widget and panel/window metaphors. A widget is a geometric user interface element. A widget might only provide information to the user or might be directly interacted with by the user. The simplest widget is a single label that only provides information. Such a label can also act as a signifier for another widget—for example, a label on a button. Many system controls are a 1D task and thus can be implemented with widgets such as pull-down menus, radio buttons, sliders, dials, and linear/rotary menus. Panels are container structures that multiple widgets and other panels can be placed upon. Placement of panels is important for being able to easily access them. For example, panels can be placed on an object, floating in the world, inside a vehicle, on the display, on the hand or input device, or somewhere near the body—for example, a semicircular menu always surrounding the waist.
When to Use
Widgets and panels are useful for complex tasks where it is difficult to directly interact with an object. Widgets are normally activated via a Pointing Pattern (Section 28.1.2), but can also be combined with other selection options—for example, select a property for objects within some defined volume. Widgets can provide more accuracy than directly manipulating objects [McMahan et al., 2014]. Use gestalt concepts of perceptual organization when designing a panel—use position, color, and shape to emphasize relationships between widgets. For example, put widgets with similar functions close together.
Limitations
Widgets and panels are not as obvious or intuitive as direct mappings and may take longer to learn. The placement of panels and widgets have a big impact on usability. If panels are not within personal space or attached to an appropriate reference frame, then the widgets can be difficult to use. If the widgets are too high, gorilla arm can result for actions that take longer than a few seconds. If the widgets are in front of the body or head, then they can be annoying due to occluding the view—although this can be reduced by making the panel translucent. If not oriented to face the user, information on the widget can be difficult to see. Large panels can also block the user’s view.
Exemplar Interaction Techniques
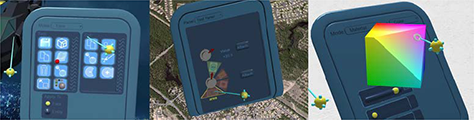
2D desktop integration. Many panels are straightforward adaptations of windows from 2D desktop systems like that shown on the left in Figure 28.8. An advantage of using desktop metaphors is their familiar interaction style and thus users have an instant understanding of how to use them. 2D desktop integration brings existing 2D desktop applications into the environment via texture maps and mouse control with pointing. The system shown in Figure 3.5 also provides desktop metaphors such as double-clicking a selected window header to minimize the window to a small cube—or double-clicking the cube to make it large again. Bringing in such existing WIMP (Windows Icon Mouse Pointer) applications is typically not ideal from a 3D interaction perspective, but doing so does provide access to software that otherwise could only be accessed by exiting the virtual world. For example, an existing 2D calculator app could be available as a cube attached to the user’s belt. The user then simply selects and double-clicks the cube to use the calculator tool without causing a break-in-presence.
In Figure 28.8, the left panel contains standard icons and radio buttons. The center panel contains buttons, a dial, and a rotary menu that can be used as both a ring menu and a pie menu. The right panel contains a color cube from which the user is selecting a color.
Figure 28.8—Three examples of hand-held panels with various widgets
Image sources: Sixense and Digital ArtForms
Ring menus. A ring menu is a rotary 1D menu where a number of options are displayed concentrically about a center point [Liang and Green 1994, Shaw and Green 1994]. Options are selected by rotating the wrist until the intended option rotates into the center position or a pointer rotates to the intended item, as shown in the center image in Figure 28.8. Ring menus can be useful but can cause wrist discomfort when large rotations are required. Non-isomorphic rotations (Section 28.2.1) can be used to make small wrist rotations map to a larger menu rotation.
Pie menus.Pie menus—also known as marking menus—are circular menus with slice-shaped menu entries, where selection is based on direction, not distance. A disadvantage of pie menus is they take up more space than traditional menus—although using icons instead of text can help. Advantages of pie menus compared to traditional menus are that they are faster, more reliable with less error, and have equal distance for each option. [Callahan, 1988] The most important advantage, however, may be that commonly used options are embedded into muscle memory as usage increases. That is, pie menus are self-revealing gestures by showing users what they can do and directing how to do it. This helps novice users become experts in making directional gestures. For example, if a desired pie menu option is in the lower-right quadrant, then the user learns to initiate the pie menu, and then move the hand to the lower right. After extended usage, users can perform the task without the need to look at the pie menu or even for it to be visible. Some pie menu systems only display the pie menu after a delay so the menu does not show up and occlude the scene for fast expert users—known as mark ahead since the user marks the pie menu element before it appears [Kurtenbach et al., 1993].
Hierarchical pie menus can be used to extend the number of options. For example, to change a color of an object to red, a user might (1) select the object to be modified, (2) press a button to bring up a property’s pie menu, (3) move the hand to the right to select colors, which brings up a colors pie menu, or (4) move the hand down to select the color red by releasing the button. If the user had to commonly change objects to the color red then she would quickly learn to simply move the hand to the right and then down after selecting the object and initiating the pie menu.
Gebhardt et al. [2013] compared different VR pie menu selection methods and found pointing to take less time and to be more preferred by users compared to hand projection—that is, translation—or wrist roll—that is, twist—rotation.
Color cube. A color cube is a 3D space that users can select colors from. In Figure 28.8, the image on the right shows a 3D color cube widget—the color selection puck can be moved with the hand in 2D about the planar surface while the planar surface can be moved in and out.
Finger menus. Finger menus consist of menu options attached to the fingers. A pinch gesture with the thumb touching a finger can be used to select different options. Once learned the user is not required to look at the menus; the thumb simply touches the appropriate finger. This prevents occlusion as well as decreases fatigue. The nondominant hand can select a menu—up to four menus—and the dominant hand can then select one of four items within that menu.
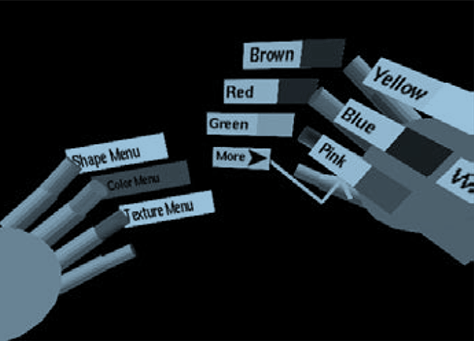
For complex applications where more options are required, a TULIP menu (Three-Up, Labels In Palm) [Bowman and Wingrave 2001] can be used. The dominant hand contains three menu options at a time and the pinky contains a More option. When the More option is selected, then the other three finger options are replaced with new options. By placing the upcoming options on the palm of the hand, users know what options will become available if they select the More option, shown in Figure 28.9.
Figure 28.9—TULIP menus on seven fingers and the right palm
Image source: Bowman and Wingrave, 2001
Above-the-head widgets and panels. Above-the-head widgets and panels are placed out of the way above the user, and accessed via reaching up and pulling down the widget or panel with the non-dominant hand. Once the panel is released, then it moves up to its former location out of view. The panel might be visible above, especially for new users, but after learning where the panels are located relative to the body, the panel might be made invisible since the user can use his sense of proprioception to know where the panels are without looking. Miné et al. [1997] found users could easily select among three options above their field of view—up to the left, up in the middle, and up to the right.
Virtual hand-held panels. If a widget or panel is attached somewhere in the environment, then it can be difficult to find. If it is locked in screen space, then it can occlude the scene. One solution is to use virtual hand-held panels that have the advantage of always being available—as well as turned off—at the click of a button. Attaching the panel to the hand greatly diminishes many of the problems of world-spaced panels—for example, panels that are difficult to read or get in the way of other objects can be reoriented and moved in an intuitive way without any cognitive effort. The panel should be attached to the non-dominant hand, and the panel is typically interacted with by pointing with the dominant hand, as shown in Figure 28.8. Such an interface provides a double dexterity”where the panel can be brought to the pointer and the pointer can be brought to the panel.
Physical panels. Virtual panels offer no physical feedback, which can make it difficult to make precise movements. A physical panel is a real-world tracked surface that the user carries and interacts with via a tracked finger, object, or stylus. Using a physical panel can provide fast and accurate manipulation of widgets [Stoakley et al., 1995; Lindeman et al., 1999] due to the surface acting as a physical constraint when touched. The disadvantage of a physical panel is that users can become fatigued from carrying it and it can be misplaced if set down. Providing a physical table or other location to set the panel on can help reduce this problem where the panel still travels with the user when virtually moving. Another option is to strap the panel to the forearm [Wang and Lindeman 2014]. Alternatively, the surface of the arm and/or hand can be used in place of a carried panel.
28.4.2 Non-Spatial Control Pattern
Related Patterns
Multimodal Pattern (Section 28.5.3).
Description
The Non-Spatial Control Pattern provides global action performed through description instead of a spatial relationship. This pattern is most commonly implemented through speech or gestures.
When to Use
Use when options can be visually presented—for example, gesture icons or text to speak—and appropriate feedback can be provided. This pattern is best used when there are a small number of options to choose from and when a button is available to push-to-talk or push-to-gesture. Use voice when moving the hands or the head would interrupt a task.
Limitations
Gestures and accents are highly variable from user to user and even for a single user. There is often a trade-off of accuracy and generality—the more gestures or words to be recognized then the less accurate the recognition rate. Defining each gesture or word to be based on its invariant properties and to be independent from others makes the task easier for both the system and the user. System recognition of voice can be problematic when many users are present or there is a lot of noise. For important commands, verification may be required and can be annoying to users.
Even for hypothetically perfectly working systems, providing too many options for users can be overwhelming and confusing. Typically, it is best to only recognize a few options that are simple and easy to remember.
Depending too heavily on gestures can cause fatigue, especially if the gestures must be made often and above the waist. Some locations are inappropriate for speaking—for example, a library—and some users are uncomfortable speaking to a computer.
Exemplar Interaction Techniques
Voice menu hierarchies. Voice menu hierarchies [Darken 1994] are similar to traditional desktop menus where submenus are brought up after higher-level menu options are selected. Menu options should be visually shown to users so users explicitly know what options are available.
Gestures. Gestures can work well for non-spatial commands. Gestures should be intuitive and easy to remember. For example, a thumbs-up to confirm, raising the index finger to select option 1, or raising the index and middle finger to select option 2. Visual signifiers showing the gesture options available should be presented to the user, especially for users who are learning the gestures. The system should always provide feedback to the user when a gesture has been recognized.
28.5 Compound Patterns
Compound Patterns combines two or more patterns into more complicated patterns. Compound Patterns include the Pointing Hand Pattern, World-in-Miniature Pattern, and Multimodal Pattern.
28.5.1 Pointing Hand Pattern
Related Patterns
Pointing Pattern (Section 28.1.2), Direct Hand Manipulation Pattern (Section 28.2.1), and Proxy Pattern (Section 28.2.2).
Description
Hand selection (Section 28.1.1) has limited reach. Pointing (Section 28.1.2) can be used to select distant objects and does not require as much hand movement. However, pointing is often—depending on the task—not good for spatially manipulating objects because of the radial nature of pointing—that is, positioning is done primarily by rotation about an arc around the user [Bowman et al., 2004]. Thus, pointing is often better for selection and a virtual hand is better for manipulation. The Pointing Hand Pattern combines the Pointing and Direct Hand Manipulation Patterns together so that far objects are first selected via pointing and then manipulated as if held in the hand. The user’s real hand can also be thought of—and possibly rendered—as a proxy to the remote object.
When to Use
Use the Pointing Hand Pattern when objects are beyond the user’s personal space.
Limitations
This pattern is typically not appropriate for applications requiring high interaction fidelity.
Exemplar Interaction Techniques
HOMER. The HOMER technique (Hand-centered Object Manipulation Extending Ray-casting) [Bowman and Hodges 1997] causes the hand to jump to the object after selection by pointing, enabling the user to directly position and rotate the object as if it were held in the hand. The scaled HOMER technique [Wilkes and Bowman 2008] scales object movement based on how fast the hand is moving—that is, object translation is based on hand velocity. Fast hand motions enable gross manipulation whereas slow hand motions enable more precise manipulation, providing flexibility of object placement.
Extender grab. The extender grab [Miné et al., 1997] maps the object orientation to the user’s hand orientation. Translations are scaled depending on the distance of the object from the user at the start of the grab—the further the object, the larger the scale factor.
Scaled world grab. A scaled world grab scales the user to be larger or the environment to be smaller so that the virtual hand, which was originally far from the selected object, can directly manipulate the object in personal space [Miné et al., 1997]. Because the scaling is about the midpoint between the eyes, the user often does not realize scaling has taken place. If the interpupillary distance is scaled in the same way, then stereoscopic cues will remain the same. Likewise, if the virtual hand is scaled appropriately, then the hand will not appear to change size. What is noticeable is head-motion parallax due to the same physical head movement mapping to a larger movement relative to the scaled-down environment.
28.5.2 World-in-Miniature Pattern
Related Patterns
Image-Plane Selection Pattern (Section 28.1.4), Proxy Pattern (Section 28.2.2), 3D Multi-Touch Pattern (Section 28.3.3), and Automated Pattern (Section 28.3.4).
Description
A world-in-miniature (WIM) is an interactive live 3D map—an exocentric miniature graphical representation of the virtual environment one is simultaneously immersed in, [Stoakley et al., 1995]. An avatar or doll representing the self matches the user’s movements giving an exocentric view of oneself in the world. A transparent viewing frustum extending out from the doll’s head showing the direction the user is looking along with the user’s field of view is also useful. When the user moves his smaller avatar, he also moves in the virtual environment. When the user moves a proxy object in the WIM, the object also moves in the surrounding virtual environment. Multiple WIMs can be created to view the world from different perspectives, the VR equivalent of 3D CAD Windowing System.
When to Use
WIMs work well as a way to provide situational awareness via an exocentric view of oneself and the surrounding environment. WIMs are also useful to quickly define user-defined proxies and to quickly move oneself.
Limitations
A straightforward implementation can cause confusion due to the focus being on the WIM, not on the full-scale virtual world.
A challenge with rotating the WIM is that it results in a lack of directional compliance; translating and rotating a proxy within the WIM can be confusing when looking at the WIM and larger surrounding world from different angles. Because of this challenge, the orientation of the WIM might be directly linked to the larger world orientation to prevent confusion—that is, a forward-up map. However, this comes at the price of not being able to lock in a specific perspective—for example, to keep an eye on a bridge as the user is performing a task at some other location—as the user reorients himself in the larger space. For advanced users, there should be an option to turn on/off the forward-up locked perspective.
Exemplar Interaction Techniques
Voodoo doll technique. The voodoo doll technique uses image-plane selection techniques (Section 28.1.3) by having users temporarily create miniature hand-held proxies of distant objects called dolls [Pierce et al., 1999]. Dolls are selected and used in pairs—with each doll representing a different object or set of objects in the scene. The doll in the non-dominant hand—typically representing multiple objects as a partial WIM—acts as a frame of reference, and the doll in the dominant hand—typically representing a single object—defines the position and orientation of its corresponding world object relative to the frame-of-reference doll. This provides the capability for users to quickly and easily position and orient objects relative to each other in the larger world. For example, a user can position a lamp on a table by first selecting the table with the non-dominant hand and then selecting the lamp with the dominant hand. Now, the user simply places the lamp doll on top of the table doll. The table does not move in the larger virtual world and the lamp is placed relative to that table.
Moving into one’s own avatar. By moving one’s own avatar in the WIM, the user’s egocentric viewpoint can be changed—that is, a proxy controlling one’s own viewpoint. However, directly mapping the doll’s orientation to the viewpoint can cause significant motion sickness and disorientation. To reduce sickness and confusion, the doll pose can be independent of the egocentric viewpoint; then when the doll icon is released or the user gives a command, the system automatically animates/navigates or teleports the user into the WIM via an automated viewpoint control technique (Section 28.3.4) where the user becomes the doll [Stoakley et al., 1995]. This avoids the problem of shifting the user’s cognitive focus back and forth from the map to the full-scale environment. That is, users think in terms of either looking at their doll in an exocentric manner or looking at the larger surrounding world in an egocentric manner, but not both simultaneously. In practice, users do not perceive a change in scale of either themselves or the WIM; they express a sense of going to the new location. Using multiple WIMs allows each WIM to act as a portal to a different, distant space.
Viewbox. The viewbox [Mlyniec et al., 2011] is a WIM that also uses the Volume-Based Selection Pattern (Section 28.1.4) and 3D Multi-Touch Pattern (Section 28.3.3). After capturing a portion of the virtual world via volume-based selection, the space within that box is referenced so that it acts as a real-time copy. The viewbox can then be selected and manipulated like any other object. The viewbox can be attached to the hand or body—for example, near the torso acting as a belt tool. In addition, the user can reach inside the space and manipulate that space via 3D Multi-Touch—for example, translate, rotate, or scale—in the same way that she can manipulate the larger surrounding space. Because the viewbox is a reference, any object manipulation that occurs in either space occurs in the other space—for example, painting on a surface in one space results in painting in both spaces. Note due to the object being a reference, care must be taken to stop the recursive nature of the view, otherwise an infinite number of viewboxes within other viewboxes can result.
28.5.3 Multimodal Pattern
Description
Multimodal Patterns integrate different sensory/motor input modalities together—for example, speech with pointing. Different modalities can work together for interaction.
When to Use
Multimodal Patterns are appropriate when multiple facets of a task are required, reduction in input error is needed, or no single input modality can convey what is needed.
Limitations
Multimodal techniques can be difficult to implement due to the need to integrate multiple systems/technologies into a single coherent interface and the risk of multiple points of failure. Techniques can also be confusing to users if not implemented well. In order to keep interaction as simple as possible, a multimodal technique should not be used unless there is a good reason to do so.
Exemplar Interaction Techniques
Immersive put-that-there. The classic example of the Multimodal Pattern is a put-that-there interface [Bolt 1980] that uses a combination of the Pointing Pattern—to select the that and there—and the Non-Spatial Control Pattern via voice—to select the verb put. Neely et al. [2004] implemented an immersive form of a put-that-there style of region definition. With this technique, the user names and defines the vertices of a polygonal region on a terrain via pointing and speaking. An example is “Make Target Zone Apple from here (pointing gesture) to here (pointing gesture) … and to here (pointing gesture).” Figure 32.2 shows the architectural block diagram for this system.
For manipulating a single object, a that-moves-there interface where the object is selected before specifying the action is often more efficient.
Automatic mode switching. One knows when the hand is within the center of vision and can effortlessly bring the hand into view when needed. Mode switching can take advantage of this. For example, an application might switch to an image-plane selection technique (Section 28.1.3) when the hand is moved to the center of vision and to a pointing selection technique (Section 28.1.2) when moved to the periphery—since the source of a ray pointer does not need to be seen.
Co-Founder & Principal Consultant at NextGen Interactions
Raleigh-Durham, North Carolina, USA
While Jason focuses primarily on his NextGen Interactions clients, he is also Chief Scientist at Digital ArtForms and Adjunct Visiting Professor at the Waterford Institute of Technology, serves on the advisory boards of multiple companies focusing on VR technologies, coordinates the Research Triangle Park-VR Meetup, and speaks about VR at various events throughout the world. Jason has been creating VR systems and applications for about 20 years, working on over 60 VR-related projects across more than 30 organizations. He holds a PhD and an MS in Computer Science, from University of North Carolina at Chapel Hill. He earned his BS in Computer Science from Washington State University. Jason is the author of the Morgan & Claypool Publishers book The VR Book: Human-Centered Design for Virtual Reality. Read More
 An interaction pattern is a generalized high-level interaction concept that can be used over and over again across different applications to achieve common user goals. The interaction patterns here are intended to describe common approaches to general VR (Virtual Reality) interaction concepts at a high level. Note interaction patterns are different from software design patterns that many system architects are familiar with. Interaction patterns are described from the user’s point of view, are largely implementation independent, and state relationships / interactions between the user and the virtual world along with its perceived objects.