These days, it’s easy to design mobile user experiences using powerful tools such as Axure RP, Blueprint, or Protot.io. But when creating early mobile designs, we should still start with the same simple sketching techniques that we’ve traditionally used for desktop designs. Now, there are apps that let us get our sketches on real mobile devices for demos and usability testing. In this article, I’ll share some of my favorite tools for sketching mobile user experiences.
When I first started designing user experiences for mobile devices, there were almost no tools whose specific purpose was sketching hand-held user interfaces. Designers were creating six-ups and Photoshop and Illustrator templates for their own use, but since these belonged to individual designers or design agencies, few became resources for the larger UX community. Fortunately, the landscape has changed, and many tools and resources are now available for designers to sketch mobile user interfaces—working within the constraints of device screen sizes—then turn their sketches into interactive prototypes.
Champion Advertisement
Continue Reading…
Sketching
When I first started sketching mobile user interface designs around the time the original iPhone came out, a 3- by 5-inch pad of Post-it notes was my preferred medium. Post-its fit nicely in people’s hands and are very inexpensive. But, while that’s still a great approach, there are now sketchpads and stencils that let us work within the context of real screen sizes and make our sketches a little more realistic for the people viewing them.
Pixle Sketch Pads
One great resource for sketching is Outline, a set of free, downloadable PDF documents from Pixle, with outlines for various mobile devices. The set covers a variety of mobile devices—although it needs to be updated for the latest iOS and Windows devices. Another helpful tool from Pixle is Tapsize, a set of PDF wireframes that show appropriately sized tap targets at the bottom of each printed page. This ensures that designers keep the size of tap targets in mind, even when they’re just working with pencil and paper. The Tapsize notations include both pixel and millimeter measurements, but it’s important to measure touch targets in millimeters because its the physical sizes of fingers that matter. Outline and Tapsize are available for download through Smashing Magazine.
Mike Warner’s iPhone 6 and 6 Plus Sketch Templates
If you need sketch designs for the iPhone 6 and 6 Plus, Mike Warner has published a set a free PDF templates. He also has published templates for the iPhone 5.
App Sketchbook
If you’re looking for something a little more polished in the form of a spiral-bound sketchbook, App Sketchbook offers books for iPhone app designs and responsive Web designs. The books currently cost $12 each and may be more appropriate if you are presenting your work to clients in an agency or corporate setting where the presentation is as important as the content. Plus, the spiral-bound sketchbooks help to keep your designs organized.
Prototyping on Paper Sketch Pads
Woomoo, the creators of the Prototyping on Paper mobile app, or POP, also offers a set of free, PDF sketchpads for iPad, iPhone 5/5s, iPhone 4, and Google Nexus 5. These work great if you’re using the POP app to turn your sketches into an interactive prototype for these devices. However, as with many of the available resources, they need updating for the most recent devices. I’ll describe creating an interactive prototype with POP later in this article.
UI Stencils
UI Stencils sells stainless-steel stencil kits and sketchpads for the iPhone and iPad, as well as Windows 8 and Android devices. The stencil kits currently start at $20; the sketchpads, at $16. UI Stencils also sells a responsive Web design sketchpad.
There are likely other sketchbooks that I haven’t mentioned, so please feel free to point out your favorites in the comments. And, as I said earlier, plain-old white paper, graph paper, or Post-its are still great options, too. Whiteboards, smartboards, or easel charts are perfect when you’re sketching with a group. After all, it’s more about the thinking process and design collaboration than the tools that you use.
Digital Sketching
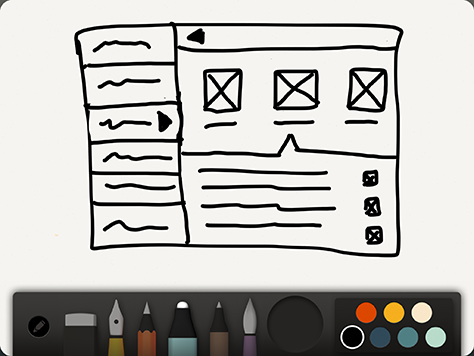
You’re not limited to sketching with pencil and paper. Two digital sketching apps that I like to use on an iPad are Paper by FiftyThree, shown in Figure 1, and Evernote’s Penultimate. Once you capture your drawings from the iPad screen using either app, you can create an interactive POP prototype from your sketches.
Figure 1—Sketch of an iPad app in Paper by FiftyThree
Paper lets you share sketches using FiftyThree’s Mix service, but drawings in Mix are public, so that’s not a good option for most real projects. If you use Evernote, you can add Penultimate sketches to a notebook in PDF format, then share that notebook with other Evernote users.
Both of these apps offer a limited selection of pen widths and colors in their free versions, and you can add more through in-app purchases. The free version of Penultimate also lets you choose blank, lined, or graph paper.
When sketching in either app, I prefer to use Wacom’s Bamboo stylus or the AmazonBasics stylus from Amazon.
Prototyping
Once you are at the point where you want to start testing or demoing your design on a real device, POP is an easy-to-use and much faster alternative to translating your sketches into a full-blown, interactive prototype using tools such as Axure RP or Protot.io. However, POP limits you to creating click-through prototypes and lacks any support for complex events or conditional interactions.
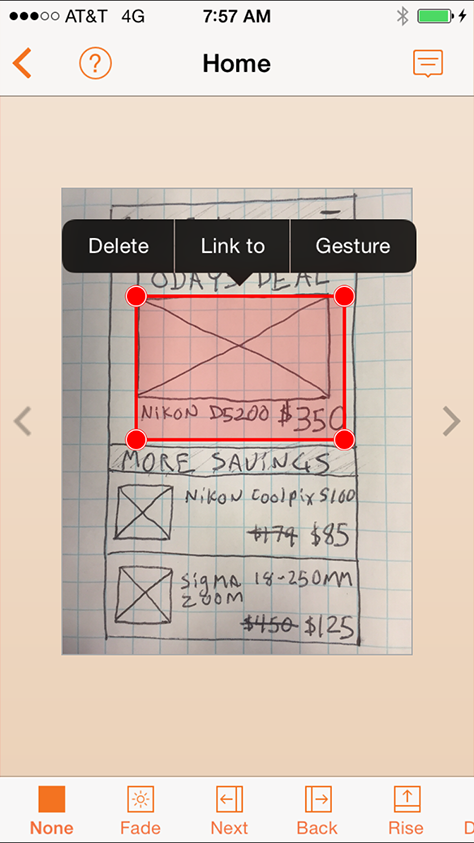
You can take pictures of your sketches, then link them together with POP, creating clickable prototypes for use on a real device, as shown in Figure 2. You can also save images in digital sketching apps like Paper and Penultimate, then use them in POP. POP is available for iPhone, iPad, and Android smartphones. You can edit the prototypes that you create using the app on a smartphone, tablet, or the Web. There also is a standalone version of the app for creating and editing prototypes on Windows tablets.
Figure 2—Creating a linked hotspot in a sketch of an iPad app using POP
Now, let’s take a look at how easy it is to turn your sketches into an interactive prototype using POP.
Step One: Sketch and Capture
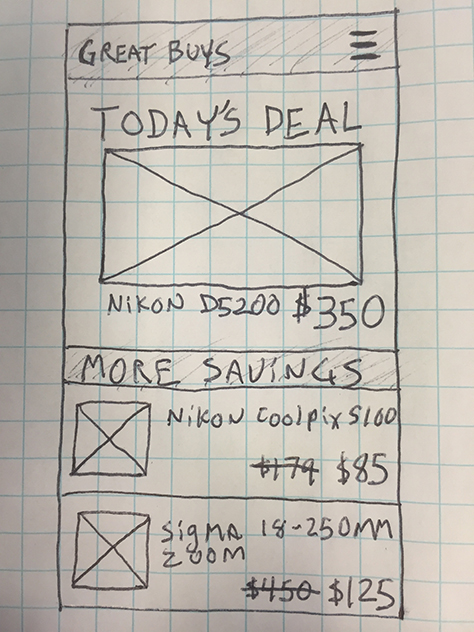
To start using POP to create a prototype, first sketch your screens. Figure 3 shows an example sketch on graph paper. Then take photos of your sketches using the camera on your iPhone or Android device or, for digital sketches, take screenshots.
Figure 3—A simple sketch on real graph paper
Step Two: Create a POP Account
To create a project on your smartphone using POP, you must first create a POP account, then sign in using your user name and password. A free POP account currently includes 20 projects, but POP’s maker, Woomoo, indicates in the app’s FAQs that this may change in the future.
Step Three: Create a POP Project
When you’re creating a new project using POP on your mobile phone, the app prompts you to name the project, then select the type of device on which you want to display your prototype—an iPhone 4/4S, iPhone 5/5S, or Android Nexus 5. You must also select portrait or landscape orientation. Portrait is the default. If you’re creating a project on an iPad, POP offers iPad as an option for display, with iPad landscape as the default.
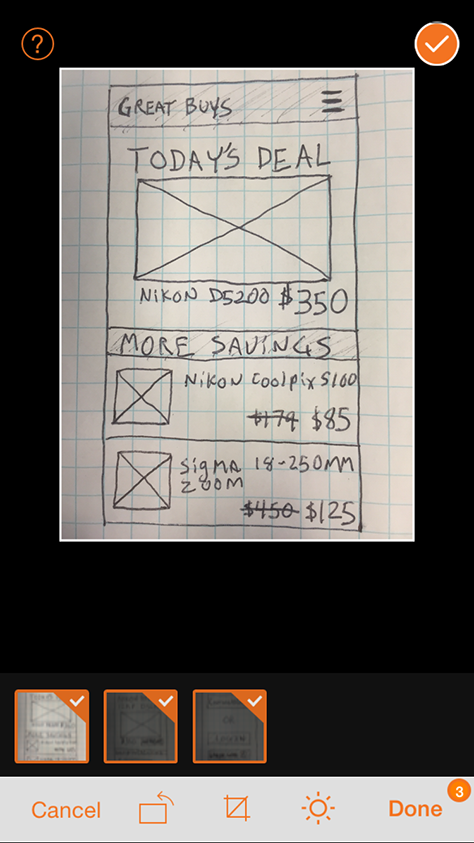
Once you’ve made these selections, you can add some images of sketches to your project—by taking new photos; using existing photos that are on your phone, as Figure 4 shows; or transferring images from Adobe Creative Cloud. POP then creates images from your photos. However, if you use POP on the iPhone 6 or iPhone 6+, your sketches will not fill the entire screen because of their larger screen resolution, and it’s not currently possible to resize the images for these devices.
Once you’ve added your images, you’re ready to begin creating a click-through prototype.
Figure 4—Adding photos to POP from the iPhone 6 photo gallery
Step Four: Making the Project Interactive
You can add interactivity to a POP prototype only by linking hotspots on images to other images. Tap the Add Link button, then size the hotspot area to any part of an image, as shown in Figure 5. When creating a link, you can set the link’s destination and the gesture that triggers the link. The destination is always another image in your POP project.
Figure 5—Creating a linked hotspot in POP
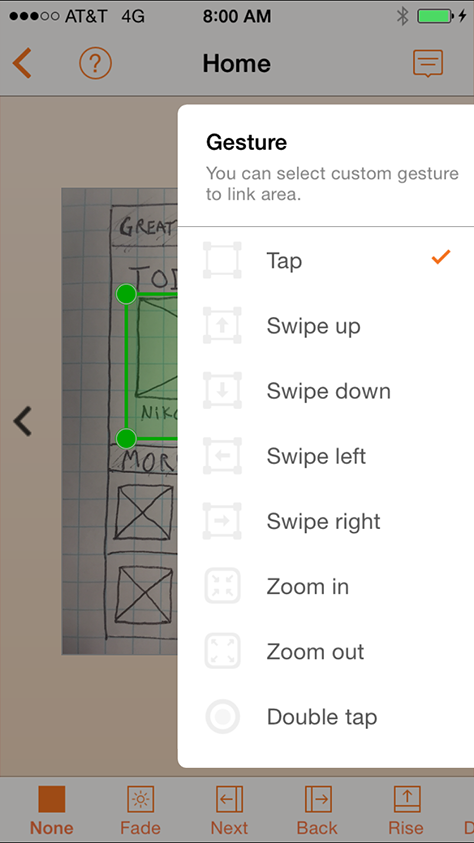
Step Five: Transitions and Gestures
POP provides a number of different transitions between images, including fade and sliding in from the left, right, top, or bottom. As Figure 6 shows, POP also supports several gestures to trigger navigation—such as tapping; double-tapping; swiping left, right, down, or up; and zooming in/out—so you can simulate interactions such as using zoom to open a full-screen view or an image or map. The default transition is None; the default gesture, a simple tap.
Figure 6—POP supports multiple gestures to trigger linked hotspots
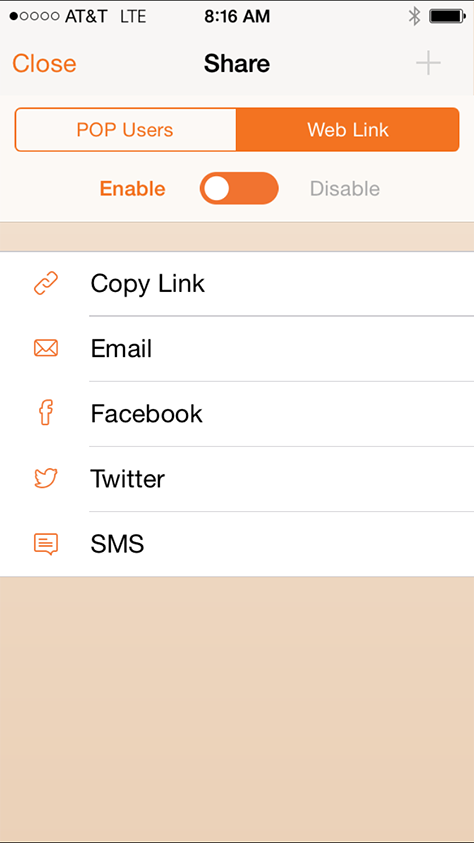
Step Six: Sharing Your Prototype
POP offers a variety of ways to share prototypes with other people, as Figure 7 shows. You can share your prototypes directly with other POP users who you know, using their email address or POP user name. You can also share a link to a project that you’ve stored on POP’s servers via email, SMS, or a post to Twitter or Facebook. If you don’t need to display your project on other devices, you can view and interact with a prototype in play mode on your own device.
Figure 7—Sharing a POP prototype so people can view it on their device
Conclusion
While there are now many tools available for creating mobile UX designs, the time-tested practice of sketching is still one of the fastest ways to create a design, then quickly get feedback from stakeholders and users. With tools such as POP, you can even display your sketches on real devices and create click-through prototypes from them. Combining either traditional modes of sketching or digital sketching with POP is a great way to blend the best of what’s always worked for designers with some of the newer possibilities that today’s apps have provided.
I’ve been delighting in using Invision to create a slightly higher fidelity prototype than the one you developed using POP. In my project, I’ve been using Fireworks to quickly sketch using layered png files and Invision’s desktop app, which is similar to Dropbox in that you write directly to a file that sits in the cloud. Then I send the project to my iPhone via text message, which is also terrific. The linking of the png graphics is easy, as with POP.
But POP seems so handy for really quick sketching—like perhaps while sharing a whiteboard with colleagues. The benefit I’ve been seeing with my method of linking sketched screens is that interactions become more pronounced—that is, the process triggers ideas about those interactions, such as “Hey, if we’re sending a notification, it should appear as part of this flow, after the user has submitted this content and before they’ve entered this screen we’ve just linked to.”
Just this morning, I happened upon a big sheet of tracing paper with the browse path for an ecommerce iPad app. I designed most of the Walgreens iPhone app in a Moleskine in Istanbul. Paper and pen works really well, and my job is to push the length of time that such sketches will get us by. As Jason Fried promotes, make decisions efficiently.
After sketching, I move to Axure, mostly because an app needs to be in a customer’s hands as quickly as possible. And, the product supports the full lifecycle of design through QA. Frankly, I haven’t found anything as fast as paper and pen or pencil to promote understanding.
Nice list! I would add Bill Buxton’s Sketching User Experiences Workbook to the list.
Good article. I think the Dropbox app Marvel is more solid to use than POP, and it can be used for mobile and Web—all the way through from sketches to comps made in Photoshop.
At GE Capital, Will works on multi-device designs for commercial lending software. He holds a Master’s in Human-Computer Interaction from DePaul University. Will is the author of Mobile Prototyping With Axure 7, and his writings have appeared in Boxes and Arrows, Smashing Magazine, UX Booth, and UX Magazine. He is a frequent speaker at design events in Chicago. Read More