This is a sample chapter from Ben Coleman and Dan Goodwin’s new book Designing UX: Prototyping. 2017 SitePoint.
Chapter 7: Building HTML Prototypes
When we say HTML prototypes, we mean a Web site comprising HTML markup, CSS for presentation, and JavaScript for additional interactivity. It may be a simple HTML Web site, or a Web site that runs on a framework or content management system (CMS).
This chapter is not a detailed step-by-step guide, nor will it teach you how to use HTML, CSS, JavaScript, or frameworks. It aims to help you understand all the options for creating HTML prototypes and their benefits. You’ll find out what’s needed to get started, and gain some guidance on how to approach creating an HTML prototype. We’ll also include some real-life prototyping case studies from some of the projects we’ve worked on at fffunction.
After reading this chapter, you should be able to make an informed decision as to what approach will suit you and your project.
Champion Advertisement
Continue Reading…
The Pros of Using HTML
Let’s look at the benefits of employing HTML prototypes.
Responsive Design
Significantly, the only way of creating a truly responsive prototype that works across multiple devices and screen sizes is with an HTML prototype.
Flexibility
An HTML prototype can be as close to—or far from—the real thing as you want it to be. Prototypes can be ready to move into production with few amendments if you so desire, or they can be kept quick and dirty for a lower fidelity experience if that suits your needs.
Complex Interactions
With HTML prototypes, you’re able to produce complex interactions involving Web technologies; for example, saving data a user enters into a prototype and revealing it later on, or altering the content user sees based on their selections.
Latest Technology
The building blocks of the Internet are constantly evolving at a fast rate. You can take advantage of this and bring the latest tools and techniques into your prototype.
Resources
Many resources exist to help you in the form of tutorials, tools, and frameworks.
Source Control for Collaboration
Using Git version control when collaborating on a prototype makes it amazingly resilient. Multiple people can work on it at the same time and commit changes without worrying about files being overwritten.
Source Control for a Historical Record
Source control also means you have a permanent historical record of all states of the prototype codebase. This is especially useful if you need to demonstrate what you have done in the past—often a requirement of public-sector or grant-funded projects.
Various Sources of Content
Content can be integrated into the prototype in different ways. Content creators can join in the process either directly in the prototype, or in another space they are more familiar with, such as a text file or CMS.
Accessibility
If you’re going to employ a prototype with an audience that has accessibility requirements, HTML prototyping is the way to go. You can test your prototype with tools and services as you build to ensure your creation is accessible. It also enables you to test with users in their standard situation and setup.
Speed of Change
Once set up, it can be super quick to show the effect of simple design in an HTML prototype, especially content changes. You can often mockup quick ideas during a review session and show it live in the browser straight away, or use browser tools to live edit the page on the fly. Other tools often require a publishing or export stage before you can show changes made.
And a Few Cons of HTML
While there aren’t too many, be alert to a few issues you may encounter when utilizing HTML prototypes.
Learning Challenges
HTML prototyping is harder to pick up than the other techniques we’ve covered. It’s technical, and there’s more than one thing you need to learn. A lot of resources and support exist to help you, and if you have the time to learn, it could save you time later on. Seek out the help of a developer with the more technical aspects, and use your time to make quick progress on designing the prototype.
Experience Limitations
As has been mentioned, there’s a lot to learn if you’re new to HTML and CSS. Your prototype’s design and interaction concepts might be too challenging to make yourself, or its functionality limited by what you can create. This is completely experience-dependent, so you should seek to partner with a developer if you can. Bear in mind the other techniques we’ve outlined in this book, and switch the tool you use to allow you to prototype as quickly and easily as possible. Prototyping a complex micro interaction in HTML, CSS, and JavaScript could be a lot easier using Keynote or PowerPoint, for example.
Planning Is a Must
Avoid diving straight into code; instead, plan what you are going to prototype first—covered next in this chapter. It’s likely an HTML prototype comes further along in the design process, after you have defined your product. It’s possible you have built other lower fidelity prototypes already.
Your HTML Prototype Planning Kit
When you begin building your HTML prototype, there are few basics you should have in place.
User Research
Design with the user in mind, so take the time to collect and digest any available research outcomes or user personas. Knowing your users up front will help you avoid creating an experience that will fail for certain audiences that you only find out about when you come to test with them.
Content
If content is available, or you’re able to create it, then utilize this; it will be a massive help having this information up front. There might be a content strategy in place or style guide to help you. It can be done in a team: while one person is building a prototype, another is writing content. It may not be production-ready content, but you should have an understanding of what content is on a page. Using draft content is better than dummy text and placeholder images.
Structure and Functionality
Know which templates and pages need creating, and the purpose of each one. A variety of sources such as user journeys, information architectures, sitemaps, or a functional specification can help inform your structure. If you’re unsure, crack open some sticky notes and start a structure yourself—it should be quick to take shape. Make notes on what happens on each page; we recommend each page containing just one purpose or action so you can then rearrange them to find the right flow.
Skills Required
How you approach building HTML prototypes depends on your skill set. If you have experience of front-end development or a working knowledge of using HTML and CSS, it’s possible to develop the prototype from scratch yourself. Even with a little knowledge you can use available frameworks, such as Bootstrap or Foundation, or CMS themes to give you a head start creating the necessary designs.
If you lack front-end development skills but know a developer with them, you can work as a team. Collaborating with a person who knows their way around HTML, CSS, and JavaScript will enable building really high-fidelity prototypes. Later, we’ll cover how two people can work on the same prototype at the same time by using Git for source control. A developer can also help with setting up a CMS, also covered later in this chapter.
When collaborating with a developer, it’s always worth having them involved earlier rather than later. Showing previous prototypes, [usability]-testing sessions, and other related research will help having a shared understanding of the project sooner. The developer can also contribute to the design of the prototype as you decide what to build together.
Collaborative working need not just be with a developer. Writers and other members of your team can be involved and add real content to your prototype, while designers can help with the visual appearance. By taking a team approach and assigning different people tasks, you can really ramp up the speed at which a prototype takes shape.
Tools for Rapid Prototyping
Prototyping should be fast, so lets look at some tools that will help you create prototypes quickly.
Preprocessors for Writing CSS
CSS preprocessors can save a lot of time and effort by enabling you to write CSS faster. While that can be done straight into a CSS file, it’s better to use a language such as Sass or Less. We’ll now look at Sass because that’s what we use at fffunction, but similar features are available in other preprocessors, such as Less.
There are several reasons to use CSS preprocessors for prototyping. One is the use of variables. Setting a variable name and value enables you to then reference it in the rest of your code. For example, a color: $primary-color: #FF5733; It’s easier to remember the variable name than a hex code, and if it needs changing, you only have to do so in one place.
Another reason is the ability to nest selectors. This allows you to structure your Sass in the same way as you structure your HTML, which is useful if you’re still learning the ropes or collaborating. Nesting can result in large file sizes of the compiled CSS file, leading to slower page load times. Yet generally you won’t be too concerned with how fast a site loads with prototypes, so nest as much as you like. Speed of coding is a priority, after all.
You can also create partial Sass files for inclusion in other Sass files. For example, _colors.scss could be a file for all your color variables, which can then be imported into other Sass files using the @import command. This keeps your code organized and makes it simpler for you and your collaborators to find values needing to be changed.
Finally, you can make mixin functions, which can help save a good deal of time not having to write repetitive chunks of code. Even better—lots of mixins are already available for you to copy into your codebase and start using. No need to even know how to create them. The following example is a mixin that defines a link style you can apply to any element:
// Defining the mixin function
@mixin linkstyle ($linkcolor) {
color: $linkcolor;
text-decoration: none;
&:visited {
color: darken($linkcolor, 10%);
}
&:hover {
border-bottom: 1px solid darken($linkcolor, 10%);
color: darken($linkcolor, 10%);
}
&:active {
border-bottom: 1px solid darken($linkcolor, 10%);
color: darken($linkcolor, 10%);
position: relative;
top: 1px;
}
}
// Apply it to an element
.typeset a {
@include linkstyle(#F25111);
}
Check out this introductory article on SitePoint to using mixins and a great library of mixins called Bourbon that’s free for you to use.
Turning the Sass code you write into CSS requires a preprocessor, which can be done using an application or command line interface (CLI) terminal method. Additionally, here are some tools that will watch your Sass or Less files for changes and automatically compile them into CSS:
For a guide on how to get started with Sass, check out Jump Start Sass from SitePoint.
Tools for Interactivity
In some prototypes, you may need to add interactivity on top of the native functionality provided by HTML; for example, a tab design or date picker. JavaScript can be used to add such interactivity. Whether you’re a developer with knowledge of JavaScript or not, we’d recommend using the JavaScript library jQuery to help speed up the process of creating additional or custom functionality.
jQuery provides a set of functions that are like shortcuts to what would otherwise be more complex JavaScript functions. They’re intuitively named—you can probably guess as to what the following common functions do:
.addClass
.fadeIn
.remove
.slideDown
The simplest use of jQuery is to alter the class of an HTML element and allow CSS to define the appearance. There are a lot of possibilities just using this approach alone.
On top of jQuery, you can add the jQuery user interface library. This goes a step further, providing a library of interface elements that you can readily use in a prototype such as:
accordions
datepickers
dialog boxes (modal)
menus
progress bars
sliders
tabs
ToolTips
Other sources of ready-made elements you can include are CoDrops and Bootsnipp. There are many others online, and you can also borrow elements from frameworks such as Bootstrap and Foundation, which we’ll cover soon.
It’s also worth considering how you can add forms to your site. Forms generally rely on server-side code such as PHP to process the fields and send the information elsewhere, and this can be tricky to get working properly. If the capture of information from forms is a requirement, try using a service such as Formspree, which forwards form information to your email address and is simple to set up. For more advanced options, take a look at FormBucket, FormKeep, or Formlets.
In some cases, you might have a more complex requirement of taking submitted form data or recording actions completed by a user, then using this data to decide what you show next, keeping it as part of the user’s session. This is getting into fairly technical territory, so you may need to enlist the help of a developer. You might be prototyping the creation of an account, and wanting to populate the prototype with the data submitted as part of the registration process. To do this, you can set cookies on a user’s browser, or use local storage capabilities to store form data. You can then pull out that data later in the user’s journey and use it to adapt the prototype’s content. This avoids awkward moments in a [usability]-testing session, such as “Let’s pretend you picked this option.” We’ll look at a real-world example of one of our projects at fffunction at the end of the chapter.
There are frameworks that provide this functionality, such as the GDS Prototype Kit, which we’ll talk about shortly. Speaking of which, we should move onto how using a framework can help.
Making Headway with Frameworks
Speed is one of the key elements of prototyping and getting a head start using prebuilt elements, or frameworks, is a great way to save time. Frameworks are collections of functional modules and templates that can be used to build a Web site. They vary from being quite basic—just enough to get you going with a creating a responsive Web site with native HTML elements—to fully featured with complicated design elements such as accordions, tabs, and off-canvas navigation.
Picking the right framework is a case of considering the feature set best able to deliver the head start you need. Consider also the coding skills you have, your familiarity with different templating languages, and the methods of running prototypes. If you’re comfortable with a PHP framework running locally on MAMP, a framework that runs on the command line may be the wrong choice for you.
Essentially, the goal is to pick the one that will allow you to do the most amount of building in a short space of time.
Let’s now look at the more popular frameworks.
Bootstrap
Bootstrap is really popular and has many features. It originated from the design team at Twitter to encourage consistency and reduce maintenance across internal tools. Since then it’s been made open source and grown over the years to keep up with developments in the industry. At the time of writing, version 4 is being prepared for release, further improving the framework and moving the grid system to use Flexbox.
Bootstrap contains a comprehensive array of basic elements:
responsive grid
typography
tables, including responsive tables
forms
buttons
images
helpers, including some that help with accessibility
Additionally, these common design patterns are also included:
accordions
alerts
carousels
drop-down menus
icons (removed in version 4)
pagination
panels and cards
tabs
When you start working with it, you’ll find it’s very well documented with several example page layouts included to help you along. There is also a “Customize and download” page, which enables you to select parts of the frameworks code for inclusion. Furthermore, it enables control of a great number of variables to configure the framework. You can adjust colors, sizes, number of columns, and other values to give you a personalized version of Bootstrap.
Everything you need is there to get up and running quickly, assembling HTML into a prototype without having to alter the CSS or JavaScript. If you want to edit the CSS, version 3 uses Less with a Sass version available; at the time of writing, version 4 will use Sass alone.
If you’d like help starting with Bootstrap, Jump Start Bootstrap, published by SitePoint can help.
Foundation
Foundation is much like Bootstrap, both being the two most popular frameworks on the Web. Googling Bootstrap vs Foundation will provide a view of an almost endless debate as to which is better. The truth is it’s almost always going to be a personal preference. Once you start using one, you’re likely to stick with it as the time invested in learning grows.
Foundation has a few useful features that Bootstrap lacks; for instance, a form validation script called Abide. There is an add-on called Joyride that enables you to easily set up a tour of your prototype to onboard new users. There’s also a more advanced off-canvas navigation pattern to use, and more example templates.
One feature highlights a key difference in the two: Bootstrap is more intended to be used as is, while Foundation is more geared towards being built upon. Panini is Foundation’s templating engine and flat file compiler. It enables using templates to build out a prototype with included partials, variables, and helpers. This allows rapid development of custom prototypes using Foundation.
Help starting with Foundation is also covered by SitePoint: see Jump Start Foundation.
Pattern Lab
Pattern Lab is both powerful and complex. Initially, it has a steep learning curve if you’re unfamiliar with the technologies used, but some of the features make this worthwhile.
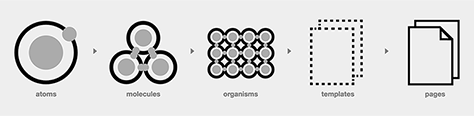
With Pattern Lab, you have both a framework to use and a pattern library in which to use it. That’s potentially quite useful if you need to document elements of your prototype as you go. It also gives you controls to navigate from pages to the components that make up the framework, known as atoms, molecules, organisms, and templates, as illustrated in Figure 7-1. If you’re already familiar with the principles of atomic design, this system will be familiar to you.
Figure 7-1—The components of atomic design
Controls are also available to determine the viewport size, which is very useful if you need to demonstrate how a design responds to different device sizes.
Pattern Lab comes in several different flavors depending on what environment you favor. There are PHP versions that use Mustache, Twig, and Drupal-ready (Twig) templating languages, and Node versions that use Gulp or Grunt. Starter kits also exist for Foundation, Bootstrap, and Material Design to give you common elements with which you may already be familiar. The most fully featured is the base demo kit, though, so it’s worth starting there.
Another powerful feature of Pattern Lab is its ability to work with data. It enables you to do this using JSON files to store simple key and value pairs. We’ll talk about how powerful an ability this is later in the chapter.
Skeleton
Skeleton is a simple starter framework. It has a grid system and basic HTML modules with CSS, such as typography, tables, lists, forms, and so forth. It’s easy to get up and running and is available with Sass and Less versions if you’re using them with which to build.
GDS Prototype Kit
If you want to build a functional journey where a user is entering information into a series of forms, it’s worth looking at the UK Government Digital Service’s (GDS) Prototype Kit. It enables you to create unique routes through the prototype based on what choices or answers users provide. It’s also a great choice if accessibility is a requirement, as one of the ten GDS design principles is to design for everyone.
As all GDS services have to achieve at least the AA WCAG accessibility standard, its prototype kit is a good base choice if accessibility needs to be catered for in your prototype; however, “it’s designed for prototyping, not for production code,” so you’ll need to test it yourself if adherence to a particular standard is needed. It’s more complex than other frameworks covered here, but is very well documented, so you should be able to have it up and running in a matter of hours.
All the Frameworks
There are many other frameworks out there, and they are well worth exploring. You should always try to fit the framework to the project, as opposed to the other way around. Here are some further frameworks worthy of your attention:
As we mentioned way back in Chapter 1, prototyping with real content will always create a better outcome for your prototype’s intended purpose. This not only makes the prototype seem more realistic, but it actually could form part of what you are trying to test.
Sourcing Content
You might need to source icons and images, and we’d recommend the following:
The simplest way to add content to an HTML prototype is to copy and paste it into HTML files that make up your prototype. You’ll need to know the basics of HTML text formatting to do this, but it’s one of the simplest parts of HTML to pick up.
There are ways of importing content from other sources that can help, such as using JSON files to document arrays of information. JSON is a simple file format that stores keys and values. The Pattern Lab framework mentioned earlier in this chapter has support for reading data out of JSON files.
Here’s an example of a JSON file that contains an array of data for a menu. Each of the navigation items uses the label value for the text of that item and the url value for the link. It’s now easy to edit that menu by altering the values in that JSON file:
// JSON menu
"primaryNav" : [
{
"label": "About",
"url": "about.html"
},
{
"label": "Team",
"url": "team.html"
},
{
"label": "Blog",
"url": "blog.html"
}
]
This data is then used within templates using templating languages such as Mustache. In this example, you can see the label and url values are used to create a menu item:
There are other templating languages that are capable of working in this way and you can also us JavaScript to pull out content from a JSON file into an HTML page.
It’s also possible for people to populate these JSON files with content for use within a prototype. Copywriters can then be brought into the prototyping process, as the files are relatively easy to understand and edit.
You can find out more about JSON in this article on SitePoint
Another way of using an external source that’s even better for involving copywriters and content creators is Google Sheets. Content is added to a spreadsheet, then parsed from that sheet to JSON to be used in your prototype. This gives you the ability to have multiple content editors working together in an environment with which they are familiar.
The final way we wanted to mention is exporting data from an existing Web site into a prototype. For example, prototyping a course finder for an education organization. There may be an existing Web site from which you can obtain an export of content. This could be exported as a CSV (comma-separated values) file, which could then be imported into a Google Spreadsheet. Another more common file type for exporting is XML (eXtensible Markup Language). XML can be used as a data source for prototyping as is, or easily converted to JSON. That data can then be read into an HTML page using JavaScript.
Using a Content Management System (CMS)
So far in this chapter, we’ve dealt with creating a prototype from scratch or by using a framework. Another way is to use a content management system, or CMS. This offers you several benefits, the clue being in the name: content management.
It helps in using real content by providing an admin interface to manage that content. This interface enables you to bring content editors and other team members into the process. Collaboration becomes easy, and several people can work simultaneously to populate your prototype with content.
Setting up a CMS, however, is rarely an easy experience for beginners. It’s better to seek the support of a developer, and then concentrate on the actual design of the prototype once it is set up.
Content management systems all come with an array of common features that will help you implement complex features into your prototype quickly and easily. It also makes it easy to edit, too. These features include:
uploading, processing, and adding metadata to media
adding, configuring, and updating menus
showing lists or groups of content dynamically
adding taxonomies to group together content, or form dynamic relationships between different types of content
pagination
You may also be able to take your code forward into the development of a product, or perhaps the content of your prototype can be migrated or exported to save you repeating the effort of collating, organizing, and uploading. We’ll talk more about this later in the chapter.
In many content management systems there is the concept of a theme: a group of templates that have a specific design and functionality. In most cases there are simple base themes that developers can utilize when starting a project. An example is the Underscores Wordpress theme, developed by Automattic (the organization behind Wordpress). This functional theme has very little styling; it’s intentionally a blank canvas to start with, but the Web site has a nice option of being able to customize the theme name and whether it uses Sass or not before downloading. Many of these base themes are good places to start.
For our purposes here, in most cases you’d want to avoid muddying the waters by presenting a prototype that’s too polished. This will render most of the themes out there unusable without you having to rip out the style while keeping the layout of a theme. Selecting a simple vanilla theme is the best way to go. In many cases your prototype is being built to test functionality, labeling, or usability, so it’s best to make them very simple monochromatic experiences. You could possibly use color for calls to action or alert messages, but you’ll want to avoid the possibility of a prototype’s visual appearance causing issues with what you are testing.
If you go through this process more than once, you’ll find that you start to build up a theme of your own to use for prototyping. At fffunction, we have base themes in place that we use to start the build of all our projects, and they can be also used for prototypes.
In addition, content management systems usually have a collection of plugins around them to extend the functionality of the core application. Again, these enable you to quickly add functionality and features that would otherwise take days to create.
Example CMSs Used for Prototyping
There are many CMSs available, so to be non-partisan about making recommendations we’ll only speak from experience here. Here are some of the content management systems we’ve used in our work over the years at fffunction.
Wordpress
Wordpress is well supported with a straightforward installation process—ideal if you’ve yet to use a CMS. There is also a massive community behind it, so it’s very easy to find help if you get stuck.
Perch
Perch is a lightweight CMS built on PHP. You can add it to an existing HTML Web site or prototype to make it content-manageable, or start from scratch to build a prototype. As Perch is a paid product, there is support from the developers should you need it.
Statamic
Statamic is a flat file CMS. This means that the site reads its content from a collection of files, rather than rely on a database of any kind. These files are commonly written in TXT or Markdown format, which is incredibly easy to pick up. Flat file CMSs are a growing breed; another we’ve used is Kirby.
Creating Accessible Prototypes
You may have accessibility as a priority for your prototypes; if that’s the case, using an HTML prototype is really the only way to do this successfully. When it comes to preparing an accessible prototype, WaveAIM tools are useful for checking accessibility. You can also run the prototype through screen readers to check how it will present your content. This can be done yourself by using the native Mac screen reader, or NVDA on a Windows machine. We’d recommend going for NVDA if possible as it has a wide user base.
The already mentioned GDS kit isn’t tested for accessibility, but we think it would make a good base with which to start, particularly if it’s used in conjunction with the UK Government’s Frontend Toollkit.
Making Prototypes Available Online
Once you’ve built your prototype, you need to put it somewhere to show others. You will have built your prototype utilizing your computer, using a local development environment to work in. While your prototype can be run on your own machine, you’ll need to move it online for others to see it. Depending on the tools you’ve used, you can do this in a variety of ways.
Sharing Your Prototype Remotely
Sometimes you’ll want to show a prototype on your local machine to a person not with you. You might want to use the prototype to explain a point, or a team of people could be working collaboratively in different places and need to discuss an issue. A product we’ve used to enable this is Finch. Finch creates a URL that lets people access the prototype on your local machine, yet keeps the rest of your computer secure. It only works while your machine is online, however, so you’ll need another option if the people you’re sharing it with need to see it at a later date.
Moving Flat File Prototypes Online
If you have a static HTML prototype, or one that has been exported to static HTML, you need a way of moving those files to a server to show them online. At fffunction, we use Surge. It’s super simple and either generates a domain for your prototype, or you can use a custom domain you already own.
Moving Content-Managed Prototypes Online
If you’re using a content-managed prototype, or if you’ve used a framework that relies on back-end code running, putting that prototype online is a little more complex. Whichever CMS or framework you’ve used should come with documentation on how to host it. You’ll probably first need to set up a server and domain name to show files. Once that’s done, transfer the files there using FTP software such as FileZilla, or use deployment services.
Tools to Automate Deployment
Rather than manually moving files when working on a prototype, there are ways to automate deployment so that your online prototype is kept up to date. If you have gone down the route of using source control with a Git repository, use online services to manage the migration—or deployment—of code to a server. You can go further and automate that deployment every time you make a commit to a branch, too, so your online prototype stays up to date. At fffunction we use DeployHQ and DeployBot for this task.
Managing Databases
You may need to migrate databases from your local machine to a live site if you’re using one, or vice versa if you want to take a database from a live site and use it on your local machine. Hosting accounts usually come with a tool to help you manage databases. It’s worth making database backups before migrating to save you from mistakes. Backups also make a useful history in case you want to move back to a previous version of the prototype. Again we’re in technical territory here, so finding a developer to help would be wise.
Hosting Providers
If you require a hosting account to run your prototype, we’d recommend looking at Digital Ocean. It’s a platform that enables you to run multiple servers, and costs about $10 a month. You might need to add Server Pilot for a LAMP setup to run PHP content management systems such as Wordpress, Laravel, or Drupal.
Another option is Heroku, which is free and can be configured to update automatically when you commit code to your Git repository. This could be a quicker way as no cost is involved and no IT department is needed to set it up.
Throwaway versus Reusable Code in HTML Prototypes
Prototypes should be quick and dirty; however, there are possibilities here to reuse elements of a prototype in the final version of a product.
Developers rarely write code for the same functionality from scratch every time; they create snippets that can be reused or, better still, independent modules of code that can be dropped into projects repeatedly and hooked up. There is always the temptation to keep parts of an HTML prototype’s codebase, and if you bear this in mind when building it, you can identify what parts you will want to take forward into production. You can then create these parts with a little more rigor than you might otherwise do.
Be aware, though, of the dangers involved in moving prototype code into production.
Using Sass can be super quick if you abandon considerations of the final CSS file’s code size; however, if you fail to address this and refactor it, you could be introducing performance issues in your Web site just in terms of download time.
In most of the final use cases of prototypes, such as demoing or user testing, you have control over the browser and devices it is viewed on. As a result, it’s unlikely to have undergone rigorous browser and device testing.
The code may not have been created with that in mind; shortcuts, quite rightly, may have been taken and so you need to be aware of this. For example you may not have followed the principles of progressive enhancement, so if a technology such as JavaScript is unavailable, the user experience is broken. Similarly, you may not have designed or coded with accessibility in mind.
As always, you need to find the right balance, depending on what the purpose of the prototype is and who is going to be using it.
Code might be just one item you want to take forward into production; you might wish to be able to export or migrate your content as well. If you’ve a content creator working on the process, or a lot of data in a database or other data source, you may be able to save time by migrating it to a production-ready version. Many of the major CMSs have features that allow export and import from others.
HTML Prototyping Case Studies
In this final part of the chapter, we look at some of the HTML prototypes we’ve built at fffunction and explain the process of each.
Dorothy House Hospice Care
The Problem
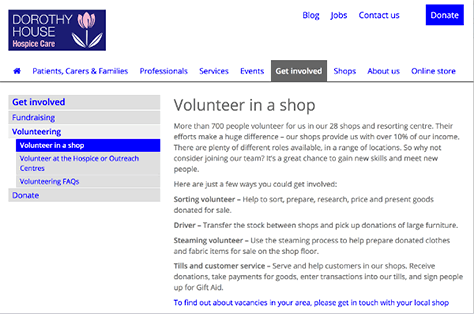
When Dorothy House came to us with a brief, the main issue with their existing site was that users found it hard to navigate to the information they needed. The site had a lot of organic content growth over time, and three main user groups who each required a unique tone of voice in terms of content.
Figure 7-2—Dorothy House Hospice Care
The Solution
Based on existing research the Dorothy House team had done, as well as our own user research, we created a new information architecture. This was the main element we needed to prototype and test with users to ensure they could find the right information. We built out a Wordpress Web site using a basic prototype theme we’d developed. As you can see from the screenshot, the design was kept really simple and almost unstyled; it didn’t need to be beautiful to test whether users could navigate it. We used a mix of dummy and real content where it was available. There were no really interactive elements on the site; we just wanted to confirm users could find what they were looking for.
We developed scenarios from the key tasks we’d worked out in user research and ran moderated tests with users. Examples of the scenarios we asked them to test were:
You’d like directions to our Trowbridge Outreach Centre. Where would you find that information?
You want to work at your local Dorothy House shop. How would you find out if there’s a vacancy?
You’d like to enter the Bath Midnight Walk. Where would you go for that?
For the most part users could find the information they needed. There was one exception, though. We tested medical professionals, carers, and people who wanted to help Dorothy House. Each of those users had a scenario that essentially asked them to look for job advertisements on the Web site. They each looked in different places: the medical professionals under Professionals; the carers under About, and the helpers under Shops. This signposted an important consideration as we went forward in the design process: people look in different places for jobs. While they might all look to be organized in one place from a content/structure perspective, jobs needed to be available in multiple places within the Web site.
The Outcome
We came out of this process with a tried and tested—and refined—information architecture that we were confident solved the old Web site’s issues. As we had built the prototype in Wordpress, we were able to take the structure forward into production and use the content we’d already inserted in the CMS as a base for the live Web site.
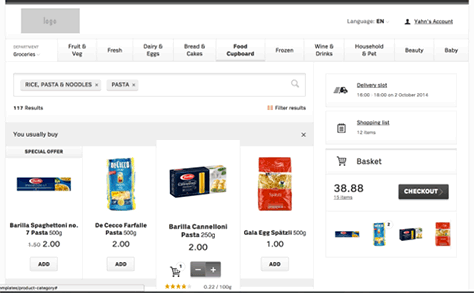
cxpartners wanted to demonstrate a new way of how an online supermarket Web site could work, so they commissioned us to build a prototype to do this. The prototype focused on how products could be grouped and filtered, and how we could create a better experience for users as they shopped online, and can be seen below.
Figure 7-3—Supermarket online shop prototype
The Solution
To create this prototype we needed products, and lots of them. We lacked the time to set up a database and associated code, so instead we created a data store in a JSON file. A member of the cx team could then think about the collation and organization of products while we focused on building the prototype templates. It enabled us to rapidly prototype the filtering of products using the data store and spend some time designing some nice interactions centered around the online shopping experience.
The Outcome
The prototype was part of cxpartners’ pitch to work with this client, and they won. The client loved the new thinking and approach, and commissioned them.
MacGuffin
The Problem
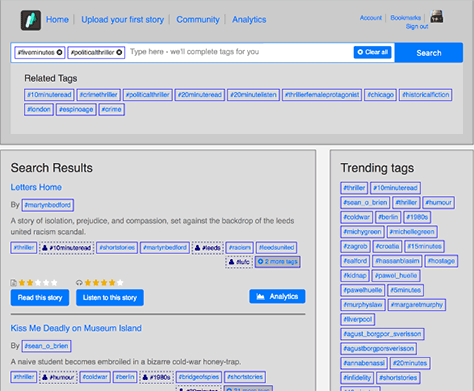
MacGuffin is an innovative short story platform that presents stories in audio and text format. It allows authors to publish short stories in both formats. These stories are able to be tagged by users to create a folksonomy, or collection of social tags, which forms a way of navigating them. There’s also an analytical element that captures user behavior on the site, so data can be collected about how they consume the content.
Figure 7-4—MacGuffin prototype
The problem? This is all fairly innovative so we had to make sure that what we designed would work with the audience. This meant building and testing a prototype with users.
The Solution
We built an HTML prototype as part of the design process and used it for several tasks, rather than having one clear goal.
The prototype enabled us to experiment with the design of the product and make decisions. For example, we prototyped the experience of reading and moving between written and spoken word. By calculating the position of the story against its length in text view, we were able to roughly work out where to start the HTML audio player when a user changed formats while consuming a story, giving them an almost seamless transition. We created a control bar for the prototype, so we were able to switch different aspects around and experiment with the way it worked and looked.
We faked a user signing up to an account and uploading their first story. We did this by storing the information they submitted in browser cookies so it would appear that the prototype had a functional back end, or CMS. This was then tested in a usability testing lab and refined to make sure users found the on-boarding process really simple.
We were also able to get an editor from the project team involved in adding some short stories to a JSON file. This meant we didn’t need to work on adding the content and could focus on designing the prototype.
The Outcomes
We were able to use prototyping throughout the design process, which enabled us to work collaboratively in a team, helped us make design decisions, validated our thinking, and constantly improved the product.
As it was a Nesta-funded project, we were required to report what we had done with the prototype. We were using Git for version control, so we were able to go back in time to show the various stages of the prototype as it evolved, pointing out what testing told us and how that shaped the product.
Together with James Chudley of cxpartners, we worked with the BBC Earth team to develop a prototype of an iPad app. The app’s purpose was to create an immersive experience that blended some interactive media from the BBC Survival series with a storytelling experience. Having sketched out and created a prototype, we had a choice to make about how a user would interact with the story elements as shown below: should the app scroll vertically or horizontally. We wanted to ensure it was intuitive to users.
Figure 7-5—BBC Earth prototype
The Solution
We prototyped an HTML version of the app and set it to run in full-screen mode, so that it looked like a native iPad app to the user. First, we created a vertically scrolling experience with some of the text content and placeholders for media. We were using Git for version control, so we made a branch, or copy, of this design and altered it to scroll horizontally. What we were aiming to do was create two experiences of the same app with the same codebase.
The Outcomes
We shared this prototype over the Wi-Fi network at a stakeholder meeting so they could all view it on their own laptops and tablets. We first served up the vertical-scrolling prototype and then the horizontal version, so everyone on the team could use the prototype, interact with it, and form an idea of the experience offered by each version. A consensus was reached to move forward with the vertical approach. The cost of producing two versions of the native iOS iPad app to do this would have taken weeks of time. We achieved this in a matter of hours and days.
Summary
In this chapter, we looked at HTML prototyping and the types of projects to which it’s suited. We covered a wide range of tools and resources that help to create prototypes quickly and easily. We looked at different ways of including content in prototypes and how to host them online in order to show them to others.
We also covered what work you should do before you start creating an HTML prototype, and thinking about what you are creating so as to avoid issues if you move it into a finalized Web site.
Lastly, we gave some real-world examples of how HTML prototypes have been used in our work at fffunction.
As Co-founder and Managing Director at fffunction, Ben wears many hats, solving design problems, running workshops, organizing content into information architectures, sketching interfaces, building prototypes, and testing them with users. He trained as a product designer in the late 1990s, earning a BSc in Product Design and Engineering, Industrial and Product Design from Liverpool John Moores University. Moving into the field of digital design shortly after he graduated, Ben brought user-centered design principles to what was then a relatively new field and has been applying them to digital projects ever since. Read More
Dan is User Experience director at fffunction, a design agency in the UK. With a background of twenty years of experience in agency and in-house software and eb development, he is an all-rounder with strong user experience, technical, and people skills. He loves doing user research and brings users and his empathy for them into every step of a project. He earned a BSc in Computer Science from University of Manchester. Read More
 When we say HTML prototypes, we mean a Web site comprising HTML markup, CSS for presentation, and JavaScript for additional interactivity. It may be a simple HTML Web site, or a Web site that runs on a framework or content management system (CMS).