A prototype is a primitive representation or version of a product that a design team or front-end-development team typically creates during the design process. The goal of a prototype is to test the flow of a design solution and gather feedback on it—from both internal and external parties—before constructing the final product. The state of a prototype is fluid as the team revises the design iteratively based on user feedback.
Why Are Prototypes Important?
Tom and David Kelley of the design company IDEO have perfectly summed up the importance of prototyping by saying:
“If a picture is worth 1,000 words, a prototype is worth 1,000 meetings.”
Champion Advertisement
Continue Reading…
Prototyping is an integral part of the design process for two key reasons:
Visualization—Prototypes help UX designers show stakeholders how the final product would look and function.
Feedback—Prototypes generate feedback from team members as well as test groups of users. Potential customers can interact with a near-final product and highlight areas that are less than user friendly. The design team can then iterate the design before the product team rolls out the final product, saving the company both time and money.
The Types and Fidelity of Prototypes
There is no single right way to construct a prototype. The type and fidelity of each prototype are at the discretion of the UX designer. However, there are a few best practices to keep in mind.
Typically, a designer determines the fidelity of a prototype depending on the stage of the design process, the available resources, and the goals for the prototype. For example, if the goal is to give the client an initial idea of the user flow, a low-fidelity prototype might suffice. But, if the goal is to run a prototype by a focus group and see how potential customers interact with it, a more aesthetically pleasing, high-fidelity prototype might be preferable.
Fidelity refers to how close a prototype is to the final product. A sketched prototype is a low-fidelity prototype, while a coded, HTML/CSS prototype has very high fidelity.
Let’s take a look at the different types of low-fidelity and high-fidelity prototypes.
Low-Fidelity Prototypes
Low-fidelity prototyping is a quick, simple way of evolving a design idea into a somewhat more tangible representation of a software product. The goal of a low-fidelity prototype is to outline a product’s flow and test the usefulness and usability of its functionality. Thus, low-fidelity prototypes are not as visually refined as high-fidelity prototypes. Examples of low-fidelity prototypes include
sketches
paper prototypes
click-through prototypes
Of course, there are pros and cons to creating low-fidelity prototypes that a UX designer must weigh before beginning a project. The key benefits of low-fidelity prototypes are that they are fast, easy, and affordable to create and strongly support collaboration. However, on the flip side, most low-fidelity prototypes are not clickable, and those that are have limitations. Low-fidelity prototypes are not as aesthetically pleasing as high-fidelity prototypes. Plus, fully understanding their functionality requires a bit of imagination.
Sketches
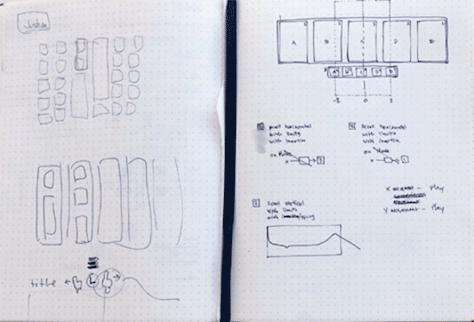
Sketched prototypes are often free-form, pen-and-pencil drawings that map out an initial idea—similar to those shown in Figure 1. They’re the most rudimentary form of prototype. UX designers typically use sketches to generate ideas and collaborate with product teams.
Typically, you’ll use sketching at the earliest stage of design. You’ll often create sketches to spark discussions about usability and project goals and generate design ideas. Either a UX designer can create the sketches or an entire product team can create them as a collaborative process. The sketching process might also involve other members of the UX team—designers and researchers—the marketing team, or other stakeholders. Once your product team has aligned on a sketch, you can use it to communicate the initial idea to other stakeholders and teams.
Benefits of Sketching
There are many benefits of sketching, but the key advantage is that it’s fast. You can create a sketch in just minute—either with pencil and paper, at a whiteboard, or using software. Sketching doesn’t require any programming knowledge. It is also cheap. When sketching is a collaborative process, it’s a helpful way of getting all stakeholders involved in the design process. Plus, sketches are easy to revise—either with an eraser or by re-arranging a collection of images.
Paper Prototypes
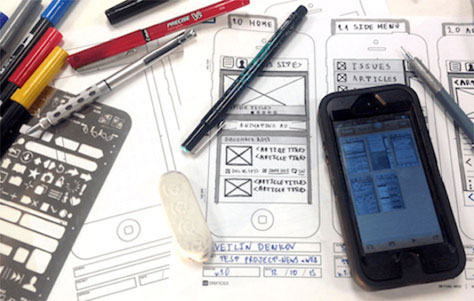
Paper prototypes are not the same thing as sketches. While teams also use them during the earliest phase of the design process, the structure of paper prototypes is more defined than that of set of sketches. While you’ll often draw sketches freehand, paper prototypes typically involve using stencils and cardboard to create more substantial, detailed mockups of various Web pages or application screens for use during usability testing. You can also couple these with Post-it Notes or other paper addons. Similar to sketching, paper prototyping is often collaborative and is a good first step before moving on to an interactive prototype. Figure 2 shows the use of tools for creating paper prototypes.
Just like sketches, you’ll usually create paper prototypes at the beginning of the design stage. Paper prototypes can be the first step of prototyping or the next step after completing your initial sketches. You can elaborate on simple sketches by adding Post-it Notes or using index cards to better show user flows or depict drop-down menus and other on-screen elements. Use paper prototypes to represent a user interface during usability testing early in the design process.
Benefits of Paper Prototyping
Similar to sketching, creating paper prototypes is fast, easy, inexpensive, and requires no technical knowledge. The process of creating a paper prototype is often collaborative. Paper prototypes are easy to revise, allowing teams to explore various user-flow options and design details.
Click-Through Prototypes
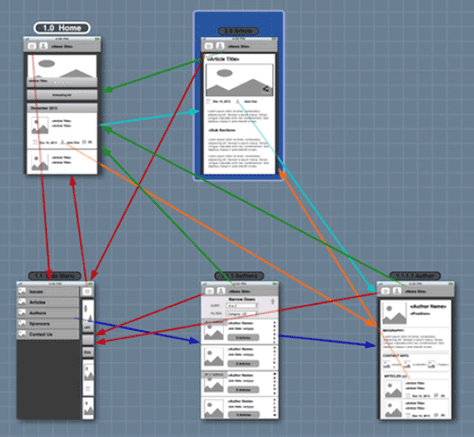
Click-through prototypes depict the elements on the pages of a Web site or the screens of an app, as shown in Figure 3. They link various screens through hotspots. These prototypes are more advanced versions of low-fidelity prototypes, as well as the simplest versions of interactive prototypes. Some applications help you create prototypes from scratch, while others let you upload your early sketches or paper prototypes, creating a digital form of those prototypes, so you can test and iterate your designs.
While sketches and paper prototypes are great initial steps, click-through prototypes help you to take things one step further. Creating a click-through prototype is a great way of testing product flows early in the design process.
Benefits of Click-Through Prototypes
Clickable prototypes more closely mimic a real user experience than sketches and paper prototypes do. Thus, they require less imagination on the part of your teammates. While they are more time consuming to create than their other low-fidelity counterparts, creating them is much less involved than creating high-fidelity prototypes.
High-Fidelity Prototypes
High-fidelity prototypes are more advanced than their low-fidelity counterparts. They are more aesthetically pleasing, and their function is closer to that of the final product. You’ll typically create high-fidelity prototypes further along in the design process, once a team has a firm grasp of what they want the finished product to embody. High-fidelity prototypes are sometimes better for usability testing than low-fidelity prototypes. Examples of high-fidelity prototypes include
interactive prototypes
digital prototypes
coded prototypes
Interactive Prototypes
Interactive prototypes, such as that shown in Figure 4, are more advanced versions of click-through prototypes that can you create using a prototyping application that supports interactivity, but only medium-fidelity visual design. In a sense, they are the culmination of the process of sketching, then creating paper prototypes or click-through prototypes. Interactive prototypes are both clickable and responsive, enabling users to interact with them and see animations in response, and they’re more aesthetically pleasing than their low-fidelity prototype precursors.
Figure 4—Creating an interactive prototype in justinmind
You’ll typically create interactive prototypes later in the design and prototyping process, once a product’s design and functionality are fairly well established. Because interactive prototypes are more realistic than low-fidelity prototypes, they’re better for soliciting feedback and doing usability testing.
Benefits of Interactive Prototypes
Interactive prototypes look somewhat more realistic than low-fidelity prototypes. They are also clickable and responsive, so they give stakeholders a pretty good idea of how the final product will look and behave. However, since you create these prototypes before the product is under development, there is still time to make design changes. You probably don’t need to know how to code to create such interactive prototypes because a variety of applications offer drag-and-drop user interfaces that make creating these prototypes a breeze.
Digital Prototypes Created with Prototyping Software
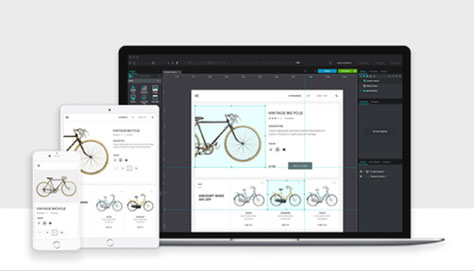
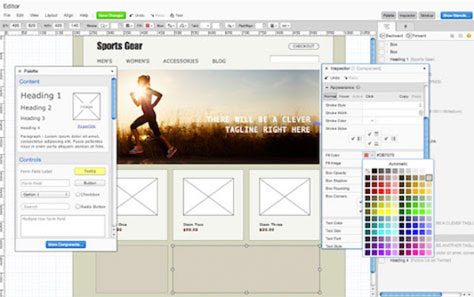
The most common type of high-fidelity prototype is a digital prototype that is developed using prototyping software that lets UX designers create aesthetically rich, interactive, and even animated product prototypes of a user interface that is almost ready for implementation. As shown in Figure 5, these prototypes are realistic looking and support more accurate testing of user-interface elements.
Figure 5—Creating a realistic-looking, digital prototype in Protoshare
Create a digital prototype only once a product and its flow are well thought out and have been approved by key stakeholders for final testing and implementation. Digital prototypes take much time and effort to construct, so creating them should never be the first step in the prototyping process.
Benefits of Digital Prototypes
Digital prototypes look—but don’t behave—as close to the final product as possible. However, they can be dynamic, animated, and offer smooth transitions between pages.
Coded, HTML/CSS Prototypes
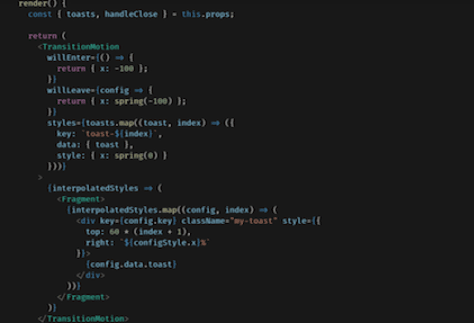
Creating a coded prototype similar to that shown in Figure 6 is more complex because it requires the UX designer or prototyper to know how to code. These prototypes are the closest to the final design of a product and are the best option for generating user feedback.
A coded prototype should be the final type of prototype you create. Because coded prototypes are the most realistic and closest to the final product, they’re ideal for usability testing. While digital prototypes look, but don’t behave like the final product, coded prototypes both look and behave as much like the final product as possible.
Benefits of Coded Prototypes
Coded prototypes are neither fast and easy to create, nor easy to revise. They are natively responsive, so people can view them on phones, tablets, or desktops. Creating coded prototypes is usually less collaborative than creating a low-fidelity prototype. However, these prototypes are very realistic. They both look and behave like the final product so are the best prototype for obtaining user feedback. Plus, you can host these prototypes on any Web server—whether public or private—so they are very easy to share with teammates, stakeholders, and potential customers or users—unlike other digital prototypes, which require specific applications to view them.
Enola Labs has best summarized the benefits of coded prototypes, saying:
“They provide an accurate, full user experience, with fully developed transition animations, button interactions, and dynamic data.”
Final Thoughts
While there are best practices for prototyping, the type and fidelity of the prototype you should create ultimately depend on project specifics and the UX designer’s preferences.
Create low-fidelity prototypes early in the design process when you are trying to represent your thoughts and collaborate with product teams to determine what the final product should be. Types of low-fidelity prototypes include sketches, paper prototypes, and clickable prototypes. Benefits of low-fidelity prototypes are that they’re
fast
cheap
easy to revise
You should typically create high-fidelity prototypes later in the design process. They’re better for usability testing, as well as for getting a team’s final signoff on a product design before development begins. Types of high-fidelity prototypes include interactive prototypes, digital prototypes, and coded prototypes. They offer the following benefits:
They’re more realistic in terms of both visual design and functionality.
They require less imagination on the part of reviewers and approvers.
They’re better for sharing with external parties and soliciting feedback
Any design artifact is an assumption that needs validation — thus some form of prototype. There are many service design products whose prototypes inevitably goes beyond just UI Screen drawings and sketches — Scenarios, Diagrams, Service blueprints are prototypes too!
Thanks for the insight. I do agree that prototyping is an integral part. But don’t you think, at some point of the design process, making prototypes with pen and paper becomes way too hectic. Initially, its all right, but you need some technology after some time.
At Springboard, a company whose focus is on bridging the world’s skills gaps through mentor-led courses, Quincy is responsible for content management. Springboard’s courses include a UX Career Track. Quincy is passionate about strong coffee, solo travel, and clean data. Read More