Statista predicts that, by 2022, virtual reality (VR) will make more than $80 million a year in headsets alone. Over the past few years, top companies such as Microsoft, HTC, Facebook, and Google have been the primary adopters of VR technology. But now, virtual reality is becoming mainstream, with small and medium companies in multiple industries embracing the technology.
What companies’ adoption of virtual reality means for UX designers is that VR design is transitioning from a rare innovation to a must-have service. Design teams must get up to speed on ideating and executing VR projects. Otherwise, they’ll miss out on a stream of potential projects. In this article, I’ll give you a full overview of how to get started with designing VR experiences, from gaining a theoretical understanding to taking practical steps. Let’s go!
Champion Advertisement
Continue Reading…
Today’s VR Products
Here’s just a brief rundown of some companies that have recently adopted VR products:
DreamVR is a 360 TV with multiple channels, communities, and content that spans many categories—including Sports, Business, Music, Art, Fashion, and Beauty. It’s an excellent destination for exploring immersive content with content creators from multiple fields.
The Italian National Agency of Tourism built a VR application that presents users with an immersive experience of tourist destinations, cafés, and restaurants. Visitors to the country can get a taste of their vacation experience before they arrive there. Tourism companies, hotels, restaurants, and other travel and hospitality businesses can actively pursue a similar strategy.
IKEA has built a VR app—a place where users can try out new furniture in their home—to help users make better purchasing decisions and remove their doubts about their selections. Retail companies and ecommerce platforms across many industries could use a similar approach.
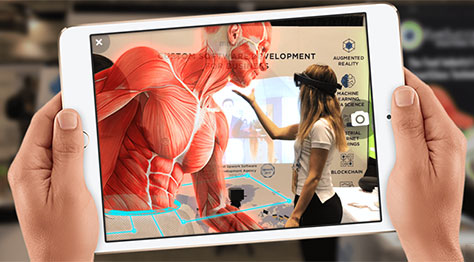
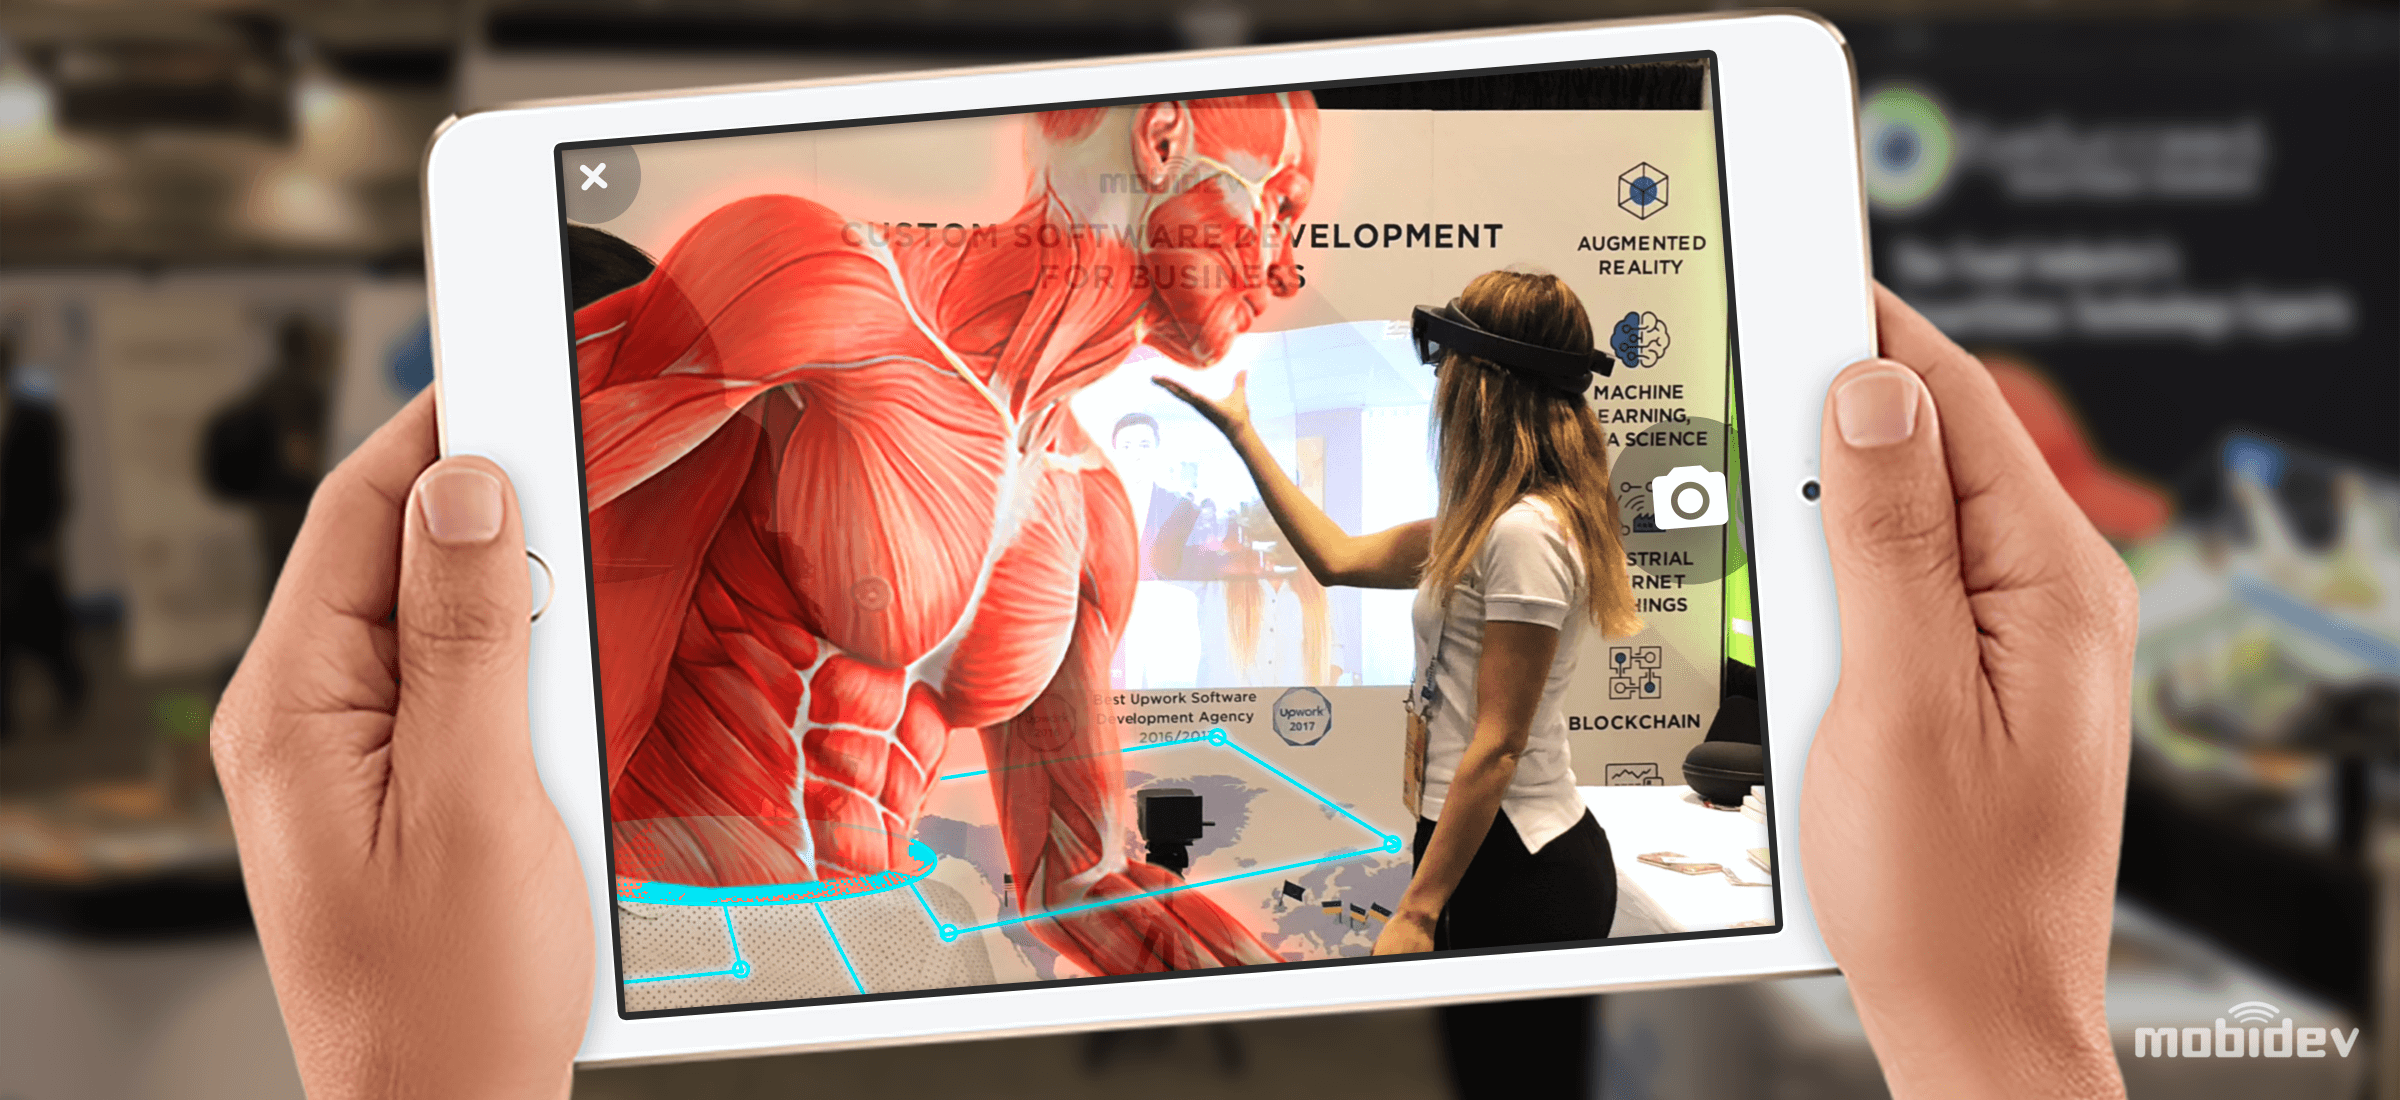
In Figure 1, you can see a mobile VR app for iPad.
Challenges of Starting Out with Mobile Virtual Reality
Most UX designers are still unsure about approaching virtual reality. There many reasons why they are delaying getting involved with VR design, including the following:
skills—Working on VR apps requires an in-depth knowledge of 3D. Plus, you must understand how VR devices function and adapt your designs to their technical specifications. You also need to work in computer-aided design (CAD) applications, create digital single-lens reflex (DSLR) 2D images, and possibly do video editing.
understanding VR design—Developing a design for a VR app is different from other types of graphic design or UX design projects. You must work within a complex environment on sophisticated user interfaces that require great attention to detail.
understanding physics—Having an understanding of physics is necessary for realistic VR design. You must be aware that you are developing simulations that rely more on the virtual environment, less on the user interface. Although users experience the existing user interface, they cannot change anything in their surroundings. Other apps have a user interface, but don’t offer a set of tools such as Samsung Gear VR, which works in the existing environment.
choosing tools for VR design—For mobile VR apps, UX designers can no longer get by with using only one tool for idea execution. First, you’ll use paper and pencil to create low-fidelity 2D sketches. Then, you’ll need new tools. Even though you can use Sketch to bring your paper drawings to digital, you’ll also need 3D and 4D tools. The go-to options in the industry are Unreal Engine, Unity, and Maya Cinema 4D.
VR Applications and Their Types
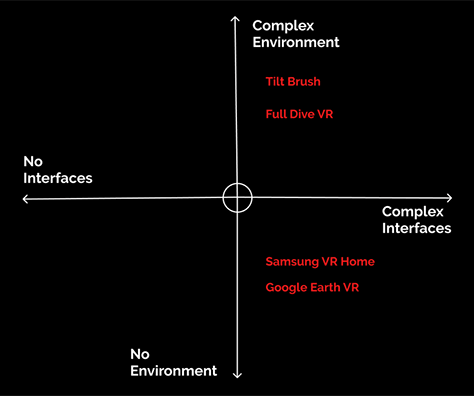
Starting out with VR design begins with gaining a knowledge of the nature of VR apps. This is not a complicated undertaking, mainly because, as Figure 2 shows, mobile VR apps comprise only two components: an environment and a user interface (UI).
Figure 2—A comparison of environments and user interfaces
Environments
A VR environment is the setting, or place, within which users interact when using a VR app. This is a third-party virtual world. On its own, the environment is static. You can’t change or manage it without a user interface. Examples of VR environments include full dive VR (FDVR) games, in which users play in realistic surroundings. Some of the most famous games that use technology similar to fully immersive virtual reality are Fallout 4 VR, The Solus Project, and Skyrim VR.
User Interfaces
A user interface is a set of features that lets users interact with an environment. If you were painting a picture, the drawing itself would be the environment and the brushes that you’d use to change and modify the environment would be the user interface. Even a very promising environment can quickly become boring without an intuitive user interface. However, it’s obvious that a user interface without an environment cannot become an actual product.
Examples of VR user interfaces include VR ecommerce tools. They let users browse products, put them into their cart, try on clothing, and make purchases. In ecommerce apps, the user interface is a lot more important than the setting because the purpose of the app is functional rather than entertainment.
Prioritizing User Interfaces over Environments—and Vice Versa
All beginning—or even experienced—VR designers must inevitably decide where to focus their efforts. Nobody can develop the perfect product that has the ultimate user interface and environment on budget and on deadline. With sufficient time and resources, you can work to improve both, but even so, one aspect of design should likely stand out. So how can you choose whether you should focus on building the environment or developing the best VR user interface possible?
If the purpose of your app is entertainment or education, it’s likely that immersion should be your priority. The rule of thumb is: the more realistic you need your mobile VR app to be, the higher-level environment you’ll need. Your priorities also depend on the level of design detail. For a very particular environment such as a detailed showcase of human anatomy or a virtual city, you must create a high-quality user interface to meet users’ expectations.
For mobile VR apps that rely on functionality first—such as ecommerce, messaging, or development tools—you should focus more on the user interface. If the environment you’re creating is a basic setting such as a person’s room, a virtual office, or a conference hall, a simple environment would do. In this case, the ultimate user experience would depend largely on functionality, not on the surroundings.
Implementing VR Design
Familiarizing yourself with basic concepts of mobile virtual reality is the first step. Now, it’s time to put this knowledge to the test before you can start designing your own product.
Step 1: Become an Active User of VR Apps
Once you know the two basic concepts that are the foundation of all VR products, you’ll need to see how other developers and UX designers have implemented them. The majority of VR apps are free for people to download from Google Play and VR. You can get started by purchasing Google Cardboard—the cheapest VR viewer out there. However, if you’re thinking about doing VR design professionally, you’ll need more a powerful VR platform. I recommend Samsung Gear VR or Google Daydream.
Step 2: VR-First Design
Usually, after exploring their first few VR apps, creative UX designers already want to tackle their own VR design projects. They get inspired by other ideas and concepts and want to start doing their own thing. While there is always the temptation to copy an existing project, that would be a waste of time. From the very beginning, your ultimate goal should be to create your own VR concepts and explore creative narratives.
Three-Dimensional Thinking
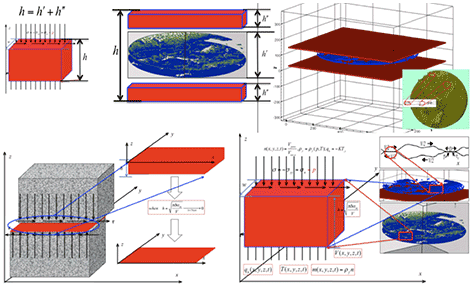
Before creating a virtual reality, you need to master some fundamental principles of spatial design. VR design requires a basic understanding of physics—although you don’t need to remember formulas such as those shown in Figure 3.
Figure 3—A three-dimensional VR & AC plastic-creep friction model
There are two basic types of spatial design, as follows:
Follow-along—As the user moves within the environment, UI elements get closer. We’ve often seen this with arcade games. A character gets closer to a particular element and, once the character gets close enough, can interact with that element.
Confined space—All UI elements are tied to a specific point in the environment. While the user moves closer to UI elements, they don’t move toward the user. They are basically the same as most of the objects we see in real life—such as a building, street sign, or a parked car. Objects have coordinates, and the user can interact with them only once they’re in that spot.
Some Practical Exercises
Here are some effective approaches to help you quickly get better at conceptualizing VR designs:
Apply real-life scenes to VR concepts. As you live your life, think about how you could transfer your environment’s lines and shapes to a VR environment. Think about what menus and features would enable such actions as opening a refrigerator door or going to bed if you lived your life in a VR simulator.
Think about 2D games in 3D. Exploring existing games is an excellent way to get more creative with your VR designs. Your real-life surroundings offer only limited narratives, so taking inspiration from shooters, arcades, and quests and modeling them in virtual reality is a good way to get creative with your VR user interfaces.
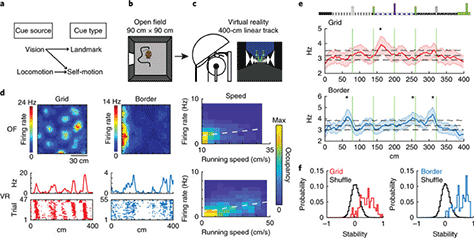
New VR Inputs
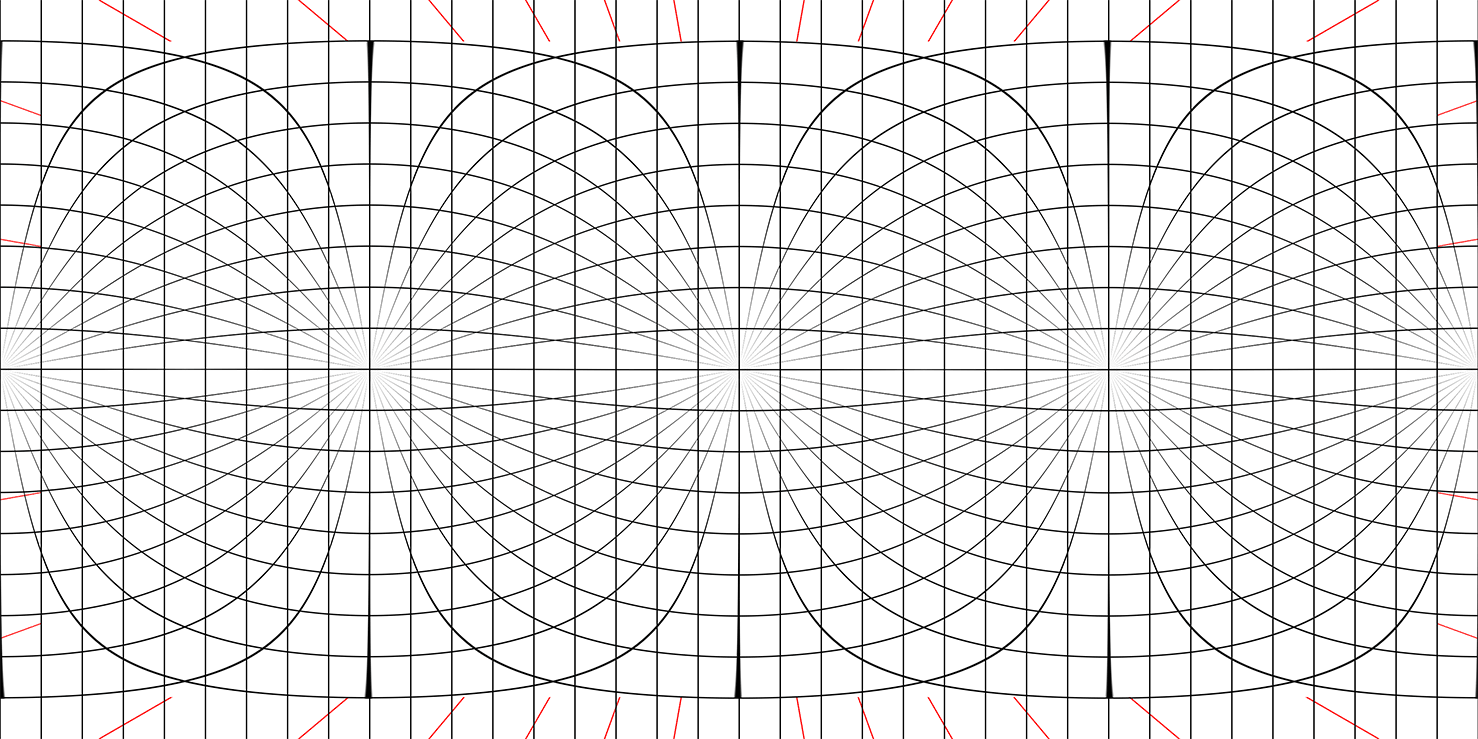
Once you’re accustomed to thinking in three dimensions, you’re ready to face a new challenge: VR user inputs. In virtual reality, people can’t rely on interacting with functionality using touchscreen devices or computers. They might not have a mouse, keyboard, console, or touchscreen. Virtual reality requires that UX designers broaden their perspective and embrace new methods of communicating with or editing an environment such as grid scale, which is depicted in Figure 4.
Be sure to take sound, speed, color, self-motion, and locomotion into account.
Types of VR Inputs
While this situation might change in the future, most VR apps and settings now enable the following types of data inputs:
gestures—The app reacts to users’ movements and offers a feature in response to a particular action or, for a game, translates actions into characters’ movements.
eyetracking—VR settings can track users’ eye movements and change the angle at which the setting appears to users.
voice—Some VR settings and apps rely on speech recognition and are capable of understanding simple voice commands. Others simply react to the sound of a voice without understanding the meaning of what the user says.
hardware—You can integrate VR platforms with click and touch controllers, which sometimes look like consoles.
Minding the Distance Between the User and an Object
For 2D objects, it doesn’t matter exactly where the user is in relation to an object, and environmental dimensions stay relatively the same. Even in 3D games, the differences are not distinct. If you make mistakes with dimensions in nonimmersive 3D design, you might get away with it. But for virtual reality, with its higher degree of visibility, every mistake becomes more visible.
In virtual reality, backgrounds, middle grounds, and foregrounds matter more. So you need to prepare designs for the different objects when they are located at various distances from viewers.
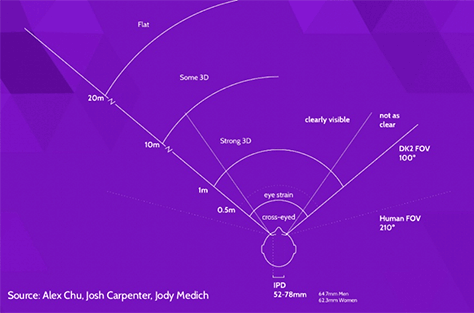
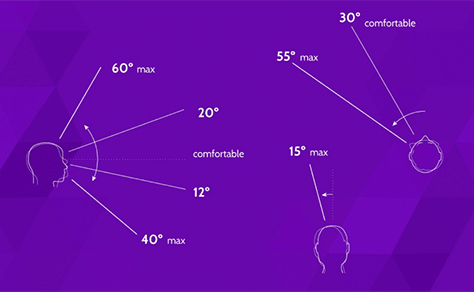
Figure 5 shows how an average user of virtual reality sees the environment and the user interface.
Figure 5—Combining FOV and rotation to get content zones
Every head-mounted display has different viewing zones. There are three particular zones that you should be aware of, as follows:
Comfortable content zones—There are spots where the content looks best and feels most realistic, based on field of view (FOV) and rotation, as shown in Figure 5.
Peripheral vision zones—You need to be mindful of content that isn’t directly in front of the user’s eyes, as shown in Figure 6. The user’s vision might actually be better than you expect.
Blind zone—The area behind the user, which the user cannot currently see, but which you should think out carefully, too.
In 2D design, UX designers generally worry only about users’ eye movements that occur in an F pattern or the Google Golden Triangle. These are the directions in which the human eye moves most quickly. In 3D design, the pattern is different, and its specifics depend on the headset’s characteristics. There is no universal pattern, so you need to find the right approach through testing. Plus, with VR, the user’s visual plane is always moving because the positions of the user’s hands, legs, and arms are dynamic.
VR Prototypes
Creating prototypes of your designs helps you decide which functions of your app you want to prioritize, evaluate which design decisions were right or wrong, and test your app in its semi-ready state. However, making a prototype is a challenge, especially for VR apps. There are many aspects to take into account, and a lousy prototype can be worse than having none.
Panoramas, or 360-Degree Photos
You can make a prototype by creating panoramas, or 360-degree images. There are tools that let you simply transfer images that you’ve photographed using a smartphone camera into a multidimensional projection.
Tools for Stitching a Panorama
There are several tools you can use to stitch together a panorama, including the following:
Image Composite Editor by Microsoft—ICE is one of the oldest tools for panorama stitching, and it’s still one of the most efficient tools. It lets you create a panorama from videos or images. You can upload photos directly from your camera or from your computer’s file storage. The application’s functionality is very simple to use and lets you stitch, export, and crop image files. The software sizes everything in a realistic way, using its built-in templates.
Hugin—There is a mini-version of this tool that is lighter than ICE, and it’s free. However, the demo version has a limitation: you can stitch together no more than five photos at a time. On the other hand, the service prefers quality over quantity, and its stitching accuracy is remarkable.
Autostitch—This simple tool for creating panoramas lets you make panoramas from an unlimited number of pictures. While the precision of this tool is lower than that of the other apps, it can work with dozens of images at a time.
Building a 3D Interface
Once you’ve created a panorama, it’s time to add functionality to it using Google Blocks. This tool makes a 3D environment out of 2D images. You can model your environment and build something close to your app’s user interface. You can place new structures and planes to create an in-app environment that is based on real-life objects. This how developers create realistic prototypes of gaming and video user interfaces.
Cinema 4D
This is the go-to option for UX designers who subscribe to Adobe’s Creative Cloud. Cinema 4D is a part of the package and lets you build a first-person or third-person 3D user interface. You can use panoramas you’ve previously created or create a 3D geometric environment from scratch.
Photoshop
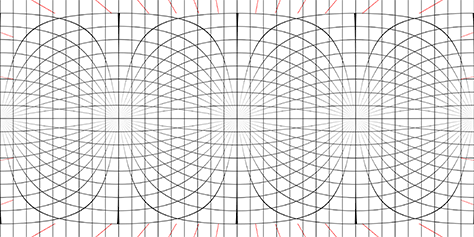
Photoshop offers a 3D-editing tool that functions similarly to panorama-stitching tools. You can upload an ordinary 2D image, transform it into a panorama by choosing 3D, then choosing Spherical Panorama. Once you have a panorama, you can modify it to create a 3D view of it. Figure 7 shows an equirectangular perspective grid for drawing spherical panoramas.
Photoshop lets you use its core image-editing tools—such as the pen tool and brush tool—to draw elements that appear to exist in 3D space. Once you’ve created a canvas for your project, you can add new 3D features. Photoshop offers a bunch of 3D brushes that let you create objects with different line thicknesses, color patterns, shades, and so on.
Sketch
If you are an active Sketch user, you can use the plugin Sketch to VR. Sketch has a Plugins panel that lets you import add-ons and add VR design features. With the Sketch to VR plugin, Sketch works similarly to Photoshop. It lets you create a panorama or upload an existing panorama and add objects to it.
Summing Up
To get started with mobile VR design, you need to spend some time researching the theoretical aspects of VR and become an effective VR user. Once you’re familiar with the requirements of the VR technology stack, building an actual VR product isn’t difficult. Even traditional design tools such as Sketch and Photoshop offer plenty of opportunities for VR design.
Finally, once you understand the basics of VR technology and you’ve built your first prototype, you’ll be at the never-ending stage of the idea search. Virtual reality, after all, is mostly about creativity and vision, just like any other type of design. Sure, you need to take more technical factors into account and have a scientific understanding of physics, but designing virtual reality is easier than it seems. Through reading this article, you’ve already familiarized yourself with the basic ideas of virtual reality, so you’re now ready to get started on your first VR project.
Constantin is a dynamic professional with more than 15 years of experience in the areas of software development, systems analysis, project management, and design, working in Ukraine and abroad. He has deep experience managing information security programs for global offices. A skilled project planner, Constantin has spearheaded numerous projects and ensured the delivery of projects within time and cost parameters. Read More
