UX design can be a very challenging task. A lot happens between conceiving of an idea or concept and delivering a ready-to-use product. UX designers must create products that meets user’s needs. Unfortunately, between the politics of various stakeholders and a variety of other inputs to the UX design process, the user can sometimes get lost in the shuffle.
Skilled UX designers and teams use tools such as empathy mapping to help them create products that keep the user or customer at the center of the design process, resulting in a product that resonates with users and provides a good user experience. But what is an empathy map, what are its uses, and how does empathy mapping fit into the UX design process?
In this article, I’ll answer all of your questions about empathy maps. From how to fill in an empathy map to what empathy-mapping tools you can use, you’ll learn everything you need to know to incorporate empathy mapping into your UX design process and use it effectively.
Champion Advertisement
Continue Reading…
What Is an Empathy Map?
Let’s start with the basics. An empathy map is a design tool that is particularly useful in UX design. This method helps you step into the shoes of your target users and understand how they think, feel, and act.
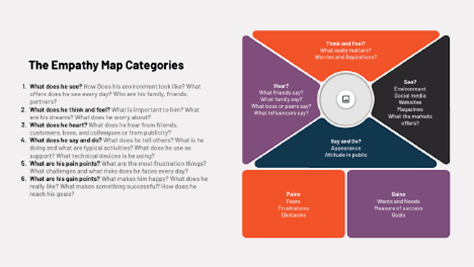
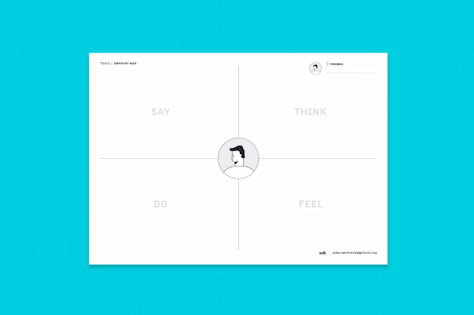
Using an empathy map, you can paint a picture of your users—and how they engage with products, services, and the world around them. You can also map out the perceptions, motivations, and behaviors that drive their decisions. Figure 1 shows an example of a four-quadrant empathy map.
Many UX designers and strategists use empathy mapping as part of their design-thinking process. It helps ensure that they create the best possible experiences for the people for whom they are designing a product or service—the users.
What Is Empathy Mapping?
Empathy mapping is the process of organizing your user research in a way that helps you to see through the lens of your audience or users.
The first step in empathy mapping is usually collecting UX research findings about your target users, using UX research tools. The type of UX research you conduct could vary depending on the project, but can include anything from user interviews, usability studies, and focus-group sessions to surveys. Once you’ve collected all this information, you can organize it within the four-quadrant diagram that an empathy map comprises, as Figure 1 shows.
Putting the map together helps you to better understand the user’s thoughts, feelings, actions, and words. An effective empathy map should help you and your team to identify areas where a user might experience painpoints—that is, areas for improvement.
Why Should You Use an Empathy Map?
Users might struggle to communicate what they want and need. Empathy mapping helps you go to beyond what users say to understand their behaviors and motivations. These invaluable insights can help you to develop more effective products that speak directly to your users. In the long run, they will give you an edge over your competitors by enabling you to identify UX trends and unique strategies that target your customer base and address their needs.
Empathy maps are also a great collaboration tool. Your team can use them to build a shared understanding and align team members on addressing your users’ needs. You can also use an empathy map as a sounding board to help you make data-driven decisions throughout the UX design process.
How to Create An Empathy Map
Creating an empathy map often sounds more complicated than it is. Its purpose is actually to simplify the empathetic-design process by presenting information in a visual chart.
Here’s how you can create an empathy map in five steps.
Set your goals. Before creating an empathy map, it’s essential to set clear goals for the project. What are you hoping to achieve? These design goals should guide your research to ensure that you collect the most relevant information to address them.
Collect your research findings. Research is the foundation of your empathy map. There is no requirement for a particular type of research, but user interviews and surveys are standard UX research methods that would prove useful.
Gather the data for each user group. Create a detailed profile, or persona, for each user group for which you are trying to design a product or service. Gather the UX research data that you’ve collected for each user profile.
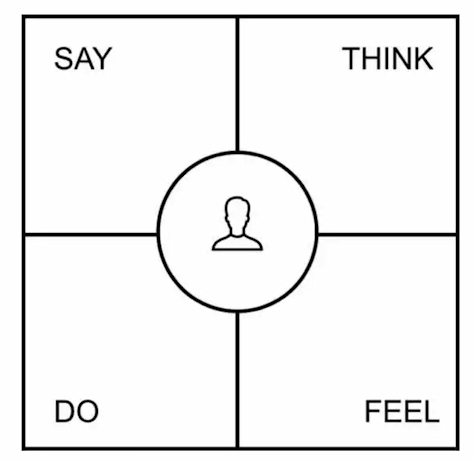
Map your research into each quadrant. Organize your UX research into the four quadrants of your empathy map: Says, Thinks, Does, and Feels.
Synthesize insights. Once you’ve created your empathy map, look for patterns and insights. You can then share this information with your stakeholders to inform design decisions.
What Are the Quadrants of an Empathy Map?
An empathy map is a four-quadrant diagram or chart that you can use to explore users’ points of view—that is, what they say, think, do, and feel, as shown in Figure 2.
says—This quadrant should highlight what users communicate verbally. Typically, this section should feature direct quotations from your user research.
thinks—This quadrant should highlight what users are thinking. This includes users’ thoughts, beliefs, and assumptions—even those they don’t necessarily say out loud.
does—This quadrant should highlight what users do, which includes their actions, behaviors, and habits. For example, they click a button on a page.
feels—This fourth and final quadrant should highlight what users feel, which includes the emotions they exhibit during a process.
Although empathy mapping is typically the first step in the design-thinking process, an empathy map should be a living document. You should continue to use it and add to it even once it’s substantially complete. Ideally, you should refer to the map throughout the design process to inform your decisions.
An empathetic UX design process comprises nine steps. Let’s look at how empathy mapping plays into each step of creating a user-focused product design.
1. Empathy Mapping
Empathy mapping is typically the first step because it informs the rest of the UX design process. This step includes user research and creating an empathy map for stakeholders to use.
2. Creating User Personas
Use the information from the empathy map to define and better understand your target users. User personas are detailed profiles that reflect the users you want to engage. Think of a user persona as an imaginary person who would use your product, but one who is based on actual UX research.
3. Defining a User Journey
Use the information from the empathy map to understand the journey a user takes from start to finish. How does the user feel? What is the user experiencing? Defining the user journey—or a type of user journey—that your users would take can help you to design the ultimate experience for your target user.
4. Building a User Flow
A user flow documents the actual actions the user would take. What buttons would the user click? What pages would the user land on? During this step, you would typically build out a flow chart. Make sure that you refer to your empathy map to understand what user flow would offer the best user experience.
5. Creating Wireframes
A wireframe is the first visual representation of a software product. Think of it as your design blueprint. Wireframes are typically black and white and extremely simple. Often designers sketch them on paper or lay them out using Post-It notes. For each stage of the user flow, lay out user-interface elements, including navigation systems or menus.
6. Establishing a Style Guide
Since wireframes are free of any color and visual-design elements, you now need to determine how the product should actually look. Creating a visual style and establishing a style guide ensures consistency throughout the design process. Refer to the empathy map to understand what would resonate with users.
7. Adding Graphic Components
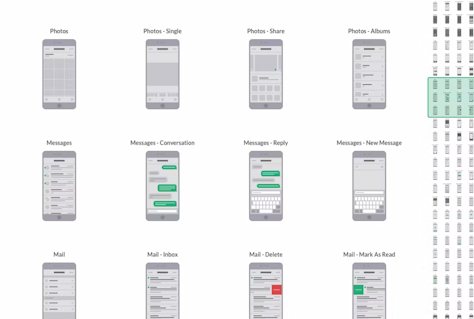
You can use the empathy map, user personas, and style guide to determine the visual components of your design, including icons, cards, bars, and controls. Use graphic-design elements that would best evoke the emotions and inspire the actions that you’ve outlined in your user journey and user flow. A UI kit, such as that the example shown in Figure 3, can help you get started adding graphic components to your design.
Figure 3—A UI kit
8. Finalizing Your Visual Design
Now, it’s time to put everything together! At this stage, you’ll create your final product, replacing the shapes in the wireframes with actual graphic components and real copy.
9. Previewing Your Final Design
Last, but not least, you must preview your final designs, as shown in Figure 4. Check that the designs are responsive and look as you intended. Make sure to test your designs on different screen sizes and verify that the graphic components look as they should.
Figure 4—Previewing your final designs on a mobile device
You could sketch out your empathy map on a piece of paper, but remember that creating empathy maps should be a collaborative, iterative process. Many empathy-mapping tools and applications enable their users to create empathy maps more effectively and efficiently. Empathy-mapping tools can improve team collaboration and make it easier to make changes as you fill in your empathy map.
Let’s look at some tools that UX designers often use as part of their empathy-mapping process.
Miro
Miro is a Web-based, digital whiteboard that helps teams to collaborate. Miro’s library makes it easy to organize information visually, offering everything from diagrams to empathy-map templates.
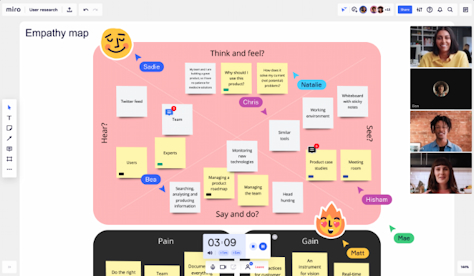
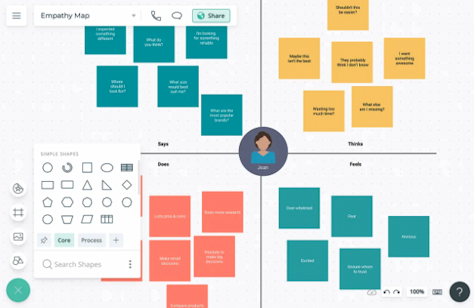
To create an empathy map using Miro, start by creating a new board. You can use Miro’s virtual sticky notes to represent the user’s thoughts, feelings, actions, and words. The application’s drag-and-drop user interface makes it easy to move sticky notes into the right quadrants. You can also add other images and visual elements, link to your UX research, and add notes and comments for other members of your team. Figure 5 shows an example of an empathy map in Miro.
The main benefit of Miro is that it is a real-time collaboration tool, so team members can work on the same map simultaneously. The application’s visual-customization options make it easy to set up your map in whatever way works best for your team. Although Miro doesn’t offer a built-in empathy-map generator, you can use their templating feature to create an empathy map that your entire team can use.
Since Miro is essentially a digital whiteboard, you can use it for other parts of your UX design process as well, such as for building user flows and wireframing.
SDT
Service Design Tools, or SDT, is a resource specifically for UX designers. It provides tools and resources for every stage of the UX design journey, making it the ultimate hub for junior and senior product designers. You can create an empathy map in SDT using a template. And this tool is free!
However, since SDT is primarily a resource rather than a tool, it is best for those who are just dipping their toe into empathy mapping. Download the free PDF template, and you can use it in your other applications. Or you can print it out and use it as the basis for a physical empathy map.
Creately
Initially a diagramming tool, Creately is a visual workspace that helps teams centralize their systems and processes using a smart visual canvas. This is a powerful platform that can connect and integrate with other design applications, too.
When empathy mapping in Creately, create a new canvas for your map, then type your data on notes and drag and drop them into the right quadrants. You can also easily link data and notes to your visuals. Figure 7 shows an example of an empathy map in Creately.
Creately also connects with many of the other tools that you probably use regularly such as Slack, Confluence, and Zapier, so you can work with these tools seamlessly. Similar to Miro, the diagramming user interface makes it easy to use Creately for other aspects of your UX design process as well. Creately offers both a cloud-based version and an offline, desktop version, making it possible for designers to work on empathy maps when they’re not on the Web.
Other UX Mapping Methods
Empathy maps are only one of many UX mapping methods. Just as with empathy maps, UX designers can use other mapping methods to gain insights into the user experience and inform their design decisions.
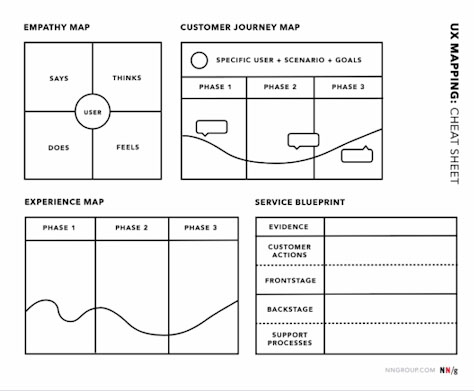
Each of the mapping methods that are available to UX designers is useful in specific use cases. You’ll likely encounter three other maps during the UX design process: the customer-journey map, the experience map, and the service blueprint. Figure 8 depicts all four of these types of maps.
A customer-journey map represents the users’ journey when engaging with a product or service.
Unlike an empathy map, a customer-journey map is chronological, so the organization of its elements is based on a timeline. The journey map shows where customers start and where they end their journey. You could begin mapping customer journeys using mind-map makers or timeline templates. This map is different from a user flow in that it doesn’t include specifics. Creating a customer-journey map can help you understand how the user interacts with the product or service over time. It also helps you identify important moments in their journey, as well as areas of friction, or painpoints.
Experience Maps
People sometimes confuse experience maps with customer-journey maps because they are also chronological. But, although they are similar, the main difference between them is that an experience map highlights how a customer’s emotions and experience change as they go through their journey. Experience mapping is an in-depth process that lets you dive into every potential customer touchpoint through every channel. UX designers often use this tool to identify touchpoints that could potentially cause either negative or positive emotional responses to your product or service. Experience mapping helps ensure that your product design is customer centric and demonstrates empathy for your users.
Service Blueprints
A service blueprint is like a visual web that connects all the facets of your customer service.
Similar to customer-journey maps and experience maps, service blueprints are also based on a timeline. However, service blueprints include all the elements that impact how your customer interacts with your product or service, including the behind-the-scenes interactions. Service blueprints typically depict these behind-the-scenes interactions perpendicular to the timeline, highlighting the separation between the process and the customer journey.
When creating a service blueprint, outline which components or touchpoints are visible to customers and which are backstage and, thus, are not visible to them. The blueprint should also connect the dots between all interactions with your customers and those that occur within the organization.
A service blueprint can help you to visually identify the relationships between your processes and the touchpoints in the customer journey. This enables you to identify areas for optimization and, thus, identifies opportunities for improving the customer experience.
Final Thoughts
The best products and services prioritize the user experience. But, to do that, UX designers must walk in the shoes of their target users. One of the best ways to do this is by using empathetic-design tools such as empathy maps. Not only can empathy mapping help product teams to design collaboratively, they also prioritize the user at every step of the design process. The result? A design that your users will use and love.
Alina is a journalist-turned-content producer who works at Envato. She is passionate about copywriting and content writing, and also enjoys writing poetry and reading nonfiction. Read More